
As an Amazon Associate, I earn from qualifying purchases at no extra cost to you.
How to Assemble OXO Mandoline Slicer the Right Way
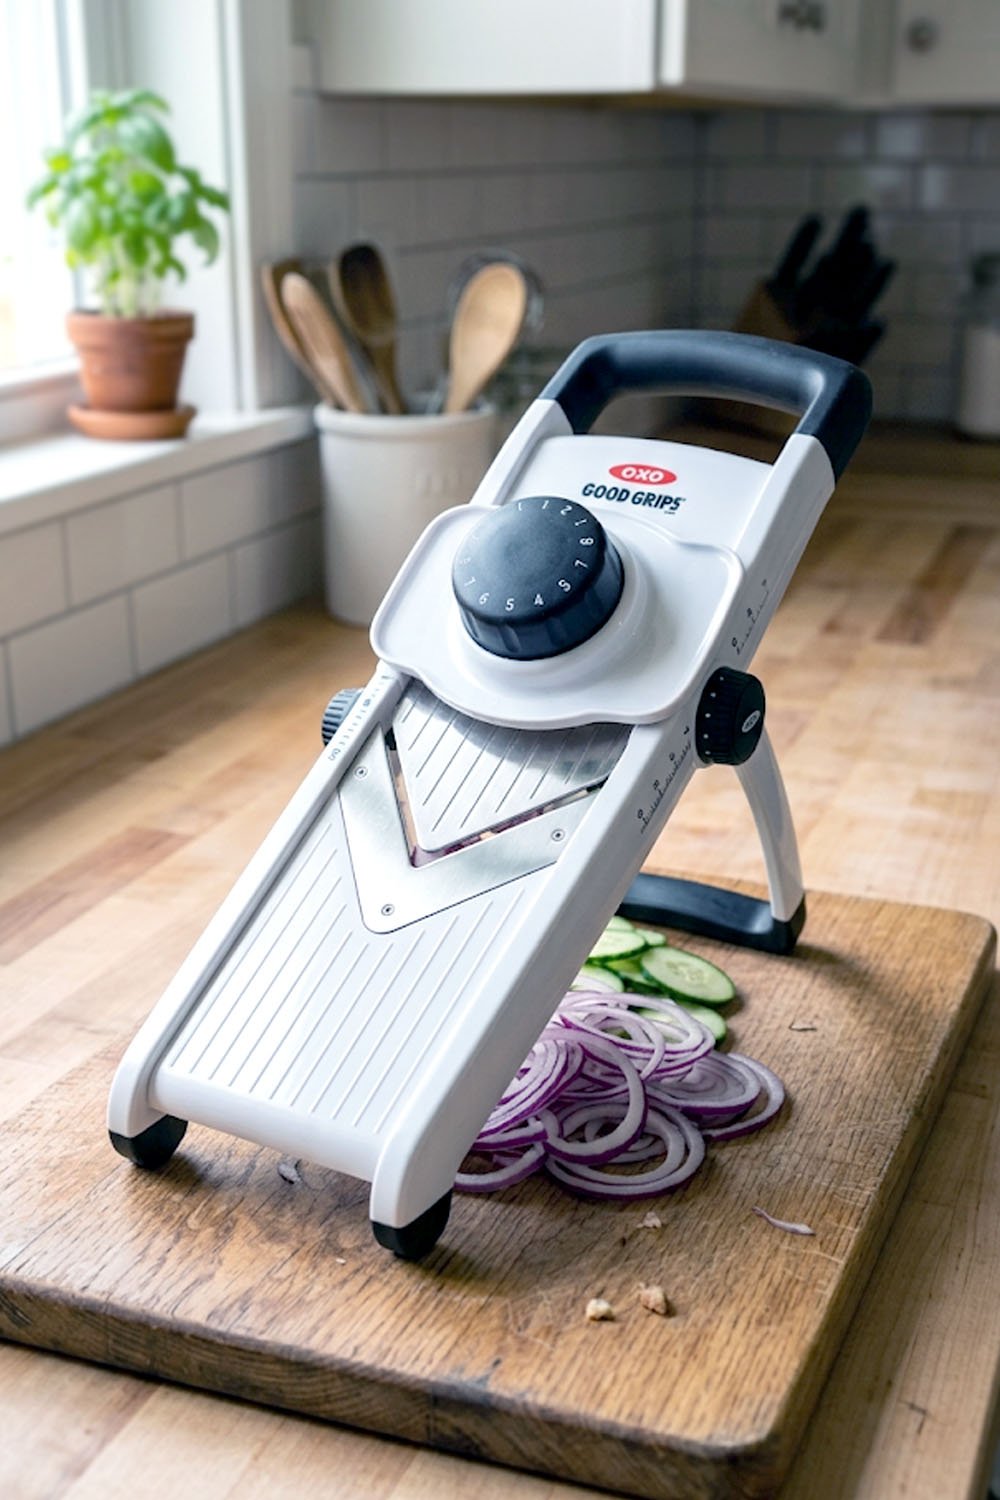
I still remember the first time I pulled my OXO Mandoline out of the box. Pieces everywhere. No clue what goes where. If you’re struggling with how to assemble OXO Mandoline slicer correctly, you’re not alone. By the end of this, you’ll know exactly what to do, step by step, without the confusion.
Start by placing the slicer body flat on your counter, then slide the food holder onto the track until it clicks, next attach your chosen blade by pressing it into the designated slot firmly, after that adjust the thickness dial to your preferred setting, and finally test the grip and stability before you slice anything.
What is the OXO Mandoline Slicer and Why Do People Love It?
So, what exactly is this thing? The OXO mandoline slicer is a kitchen tool that cuts vegetables and fruits into thin, even slices super fast. It does in seconds what a knife takes minutes to do. Chefs love it. Home cooks love it even more.
The reason people go crazy for it is the consistency. Every slice comes out the same thickness. That matters a lot when you’re making potato gratin, cucumber salads, or anything where even cooking is important. Uneven cuts ruin dishes. This tool fixes that.
But here’s the thing, it only works well when it’s assembled correctly. A loose blade or a wobbly food holder can be dangerous. So getting the setup right isn’t just about convenience. It’s actually about keeping your fingers safe too.
Once you get the hang of it, the whole process takes less than a minute. It feels satisfying, honestly. Everything locks in place with a solid click, and you just know it’s ready to go.
Here’s what makes the OXO mandoline slicer stand out:
- It has a foldable, non-slip base that keeps it steady on any surface
- The food holder has built-in spikes that grip produce firmly
- Blade changes are simple and don’t require any special tools
- The thickness dial gives you precise control over every slice
- It’s made from BPA-free materials, so it’s safe for everyday cooking
- Cleaning is easy because most parts are dishwasher safe
How to Assemble OXO Mandoline Slicer Step by Step the Easy Way
Step 1: Unbox and Lay Out All the Parts First
Before anything else, take everything out of the box and lay the pieces on your kitchen counter. You’ll see the main slicer frame, a food holder, a few blades, and a blade storage case. Take a moment to look at each piece. Don’t rush this part.
Getting familiar with the parts makes the whole process so much easier. The main frame has a flat slicing surface with a track running along both sides. Those tracks are where the food holder slides in. The blades are sharp, so be careful right from the start.
Also, keep the manual nearby if this is your first time. It has a small diagram that helps you match parts quickly. Once you’ve done it a couple of times, you won’t need it anymore. But that first time, it really helps to have it close.
- Take all pieces out before starting
- Identify the frame, food holder, and blades
- Keep the blade storage case nearby
- Read the diagram in the manual quickly
Step 2: Set Up the Non-Slip Base Properly
Flip the slicer frame over and you’ll see small rubber feet on the bottom. These keep the slicer from sliding around while you use it. Place it on a flat, dry counter surface. Give it a little push to make sure it doesn’t move.
Some OXO models also have a fold-out leg that props the frame up at an angle. If yours has that, pull it down and lock it into place. That angle makes slicing feel more natural and controlled. It also helps the sliced pieces fall away cleanly.
This step sounds small, but it matters more than you’d think. A slicer that moves while you’re cutting is a slicer that can hurt you. So take ten seconds, set the base right, and move forward with confidence.
- Place the slicer on a dry, flat surface
- Check that the rubber feet grip the counter
- Fold out the support leg if your model has one
- Give the frame a push to confirm it’s stable
Step 3: Attach the Right Blade for Your Job
Here’s where it gets interesting. The OXO mandoline comes with different blades for different cuts. There’s usually a straight blade for plain slices, a julienne blade for thin strips, and sometimes a waffle or crinkle blade. Pick the one you need before attaching.
To insert the blade, hold it by the plastic edge only, never touch the metal cutting edge. Slide it into the slot at the top of the slicing surface. Push it firmly until you feel it snap or lock into place. Give it a gentle tug to make sure it’s secure.
If the blade feels loose or wiggly, take it out and try again. A blade that isn’t locked in can shift mid-slice, and that’s not something you want. When it’s seated correctly, it feels solid and flush with the surface.
- Always hold blades by the plastic edge
- Match the blade to the cut you need
- Slide it into the blade slot and push firmly
- Tug gently to confirm it’s locked in place
Step 4: Slide the Food Holder onto the Track
The food holder is the part that keeps your fingers away from the blade. This is non-negotiable. Please always use it. It has little spikes on the bottom that grip your food and a handle on top for your hand.
To attach it, line it up with the track on both sides of the slicer frame. Then slide it forward toward the blade end. It should glide smoothly along the track with no resistance. If it feels stuck, check that it’s aligned evenly on both sides.
Once it’s on the track, slide it back and forth a couple of times. It should move freely and smoothly. That smooth movement is what makes slicing feel effortless later. A stiff or off-track food holder will make the whole experience frustrating.
- Always use the food holder, every single time
- Align it with both sides of the track evenly
- Slide it back and forth to test smooth movement
- Never skip this part, even for quick slices
Step 5: Set the Thickness Dial to What You Need
On the side or bottom of the slicer frame, you’ll find a dial or adjustment knob. This controls how thick or thin your slices come out. Turn it to the right for thicker slices, turn it to the left for thinner ones.
Most OXO models have clear markings showing millimeter settings. For paper-thin cucumber slices, go to 1mm or 2mm. For potato chips or zucchini rounds, try 3mm to 4mm. For heartier cuts like dauphinoise potatoes, go 5mm or more.
It’s worth doing a quick test slice on a scrap piece of vegetable before you commit to a whole batch. That way you can fine-tune the thickness without wasting good produce. Small adjustments make a big difference in the final result.
- Find the thickness dial on the side or bottom
- Turn right for thicker, turn left for thinner
- Use millimeter markings as your guide
- Always do a test slice before starting your batch
Step 6: Do a Safety Check Before You Start Slicing
Almost there. Before you slice anything, do a quick check of everything. Is the base stable? Is the blade locked in? Is the food holder moving smoothly on the track? Is the thickness set where you want it? Run through all of this in about 20 seconds.
This habit might feel unnecessary at first. But trust me on this, a 20-second check saves you from a lot of potential problems. A blade that wasn’t fully locked, a wobbly base, a food holder off its track, these are all things a quick look will catch before they become a problem.
Once everything checks out, place your food item on the spikes of the food holder. Press it down so the spikes grip it firmly. Then slide the food holder back and forth across the blade in a smooth, steady motion. That’s it. You’re slicing like a pro.
- Check base stability one more time
- Confirm the blade is firmly locked
- Verify the food holder slides smoothly
- Press food firmly onto the spikes before slicing
How Do You Clean and Store the OXO Mandoline Slicer Safely?
Cleaning a mandoline slicer feels scary at first because of the blades. But honestly, it’s straightforward once you know the right approach. First, disassemble everything the same way you put it together, just in reverse. Remove the food holder, take out the blade carefully using the plastic edge only, and set it aside.
The main frame and food holder are usually dishwasher safe, which is a huge relief. Just toss them on the top rack and let the machine handle it. If you prefer hand washing, use a soft sponge and warm soapy water. Never scrub across the blade, always wipe away from the edge.
For the blades, hand washing is actually the safer and better option. Hot dishwasher water can sometimes dull a sharp blade faster than you’d expect. So rinse the blade under running water and wipe very gently with a soft cloth, moving away from the sharp edge at all times.
Storage is the final step people often ignore. Always put blades back in the blade storage case that came with the slicer. That case protects the edge and, more importantly, protects your hands next time you reach for it. Store the whole thing in a drawer or cabinet where it won’t get knocked around.
Here are the best habits for cleaning and storing your slicer:
- Remove blades using the plastic edge only, never touch the metal
- Wash the frame and food holder on the top rack of the dishwasher
- Hand wash blades with a soft cloth, always wipe away from the edge
- Dry all parts fully before storing to prevent rust or mildew
- Keep blades in the original storage case between every use
- Store the assembled slicer flat so no pressure sits on the blade
Final Thoughts
I hope this guide made the whole thing feel way less scary. Honestly, once you do it once, assembling your OXO mandoline slicer takes no time at all. Just follow the steps, do your safety check, and you’ll slice like a total pro. You’ve got this. Go enjoy the process, and happy cooking!
| Part | What It Does | How to Attach | Safety Tip | Cleaning Method | Storage Tip |
|---|---|---|---|---|---|
| Main Frame | Holds everything together and forms the slicing surface | Set flat on counter with rubber feet down | Check stability before every use | Dishwasher safe, top rack | Store flat to protect the surface |
| Non-Slip Base / Feet | Keeps the slicer from sliding during use | Already attached, fold out leg if available | Use only on dry, flat surfaces | Wipe with damp cloth | Keep dry to maintain grip |
| Straight Blade | Makes clean, even flat slices | Slide into top slot, press until it clicks | Hold by plastic edge only, never touch metal | Hand wash with soft cloth, wipe away from edge | Store in blade case always |
| Julienne Blade | Creates thin strips for salads or stir-fry | Same slot as straight blade, swap as needed | Change blades with slicer face down | Hand wash carefully, dry fully | Keep in blade case with label |
| Food Holder | Holds food and keeps fingers away from blade | Align with tracks, slide forward until seated | Always use it, no exceptions | Dishwasher safe, top rack | Store attached to frame or separately |
| Thickness Dial | Controls how thick or thin each slice comes out | Turn dial on side or bottom of frame | Set before slicing, test on scrap piece first | Wipe with damp sponge | Leave at zero setting when storing |
Frequently Asked Questions (FAQs)
Is It Safe to Assemble the OXO Mandoline Slicer Without Gloves?
You can, but wearing cut-resistant gloves is a smart move, especially when handling blades. It takes only a second to put them on, and they give you real peace of mind while you work.
Can I Use the OXO Mandoline Slicer Without the Food Holder?
Technically yes, but please don’t. The food holder exists to protect your fingers from the blade. Skipping it is how most slicing injuries happen. Always use it, no matter what.
Is It Hard to Change Blades on the OXO Mandoline Slicer?
Not at all. Just hold the blade by the plastic edge, slide it out, and slide the new one in until it clicks. The whole swap takes about ten seconds once you’ve done it once or twice.
Can I Put All OXO Mandoline Parts in the Dishwasher?
The frame and food holder are dishwasher safe. However, it’s better to hand wash the blades. The dishwasher’s heat can dull them faster over time, and hand washing keeps them sharper longer.
Do I Need Any Special Tools to Assemble the OXO Mandoline Slicer?
Nope, not a single tool needed. Everything clicks, slides, or locks by hand. That’s one of the best things about this slicer. It’s designed to be totally tool-free for everyday home cooks.
Is the OXO Mandoline Slicer Good for Beginners?
Yes, absolutely. It’s one of the most beginner-friendly mandolines out there. The parts make sense, the assembly is logical, and the food holder makes it much safer than older-style slicers with no hand guard.
Can I Adjust the Thickness After I Start Slicing?
Yes, you can stop mid-session, adjust the dial, and continue. Just make sure the slicer is stable when you do it. It’s always a good idea to do a test slice after any adjustment before going back to your main batch.
Do I Have to Dry the Parts Before Storing the Slicer?
Yes, please do. Storing wet parts, especially the blade, can lead to rust or dull edges over time. A quick pat dry with a clean towel takes seconds and keeps your slicer in great shape for years.
