
As an Amazon Associate, I earn from qualifying purchases at no extra cost to you.
How to Cook Chicken Tenders in Air Fryer (Quickly and Easily)

You've got chicken tenders and your air fryer, ready for a fast, crispy meal. You want them perfectly cooked, golden brown, and tender inside without being greasy or dry. This guide cuts through the guesswork, giving you the exact steps needed. I will show you how to get them just right every time.
Cooking chicken tenders in your air fryer is all about achieving that perfect balance: a delightfully crispy exterior that snaps when you bite it, while keeping the inside juicy and tender. This method cooks them fast without needing much oil. You will get restaurant-quality results right in your own kitchen, saving you time and making cleanup a breeze. Your family will love these.
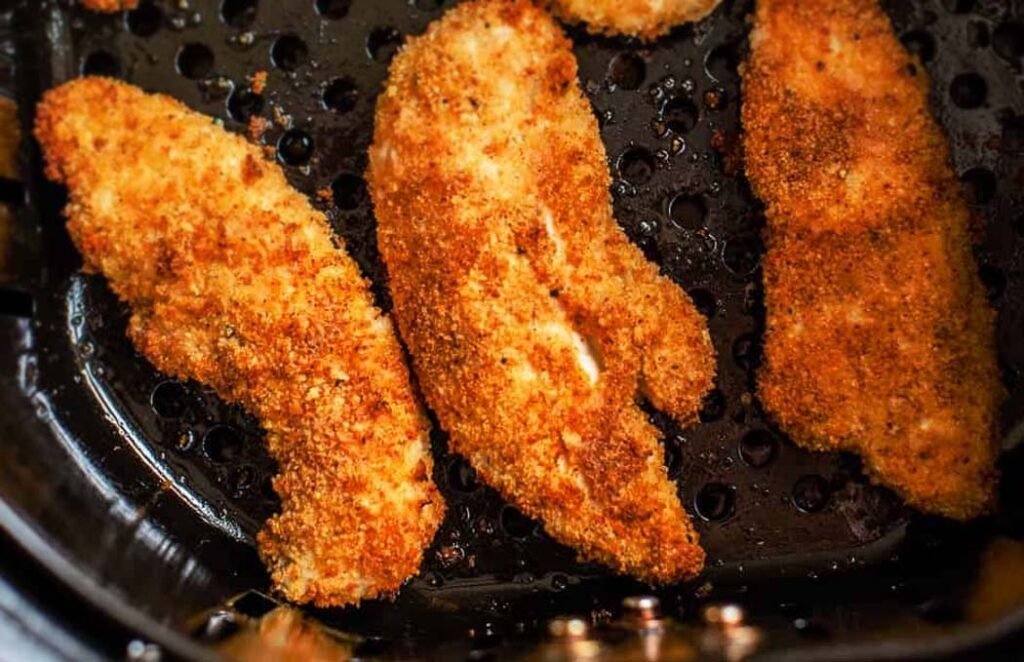
Why Air Frying Tenders Works Best
Your air fryer is ready to make these tenders taste amazing. It uses hot air to cook food quickly. You will get a nice crunch without all the oil.
Crispy Coating
The key here is the coating. It's what gets golden and crisp. Breadcrumbs or panko are your best friends for this. You want a coating that holds up to the hot air circulation.
Your coating needs to be applied evenly. If parts are missed, they might turn out pale and soft. The circulating air hits every side of the tender for an all-around crisp.
So, make sure you press the coating firmly onto the chicken. This helps it stick during cooking. You want that satisfying crunch.
Fast Cooking Time
Air fryers cook food much faster than a conventional oven. This is because the hot air is concentrated and circulated intensely. You can get dinner on the table in minutes.
This speed means you have to watch them closely. Undercooked tenders are not safe. Overcooked ones can become dry and tough. Your timing needs to be precise.
Be ready to check them a minute or two early. This allows you to adjust if needed. You will get them perfect.
Less Oil Needed
You do not need a deep fryer for crispy chicken. An air fryer uses just a little oil, or sometimes none. It mimics deep frying with a fraction of the grease.
This makes your tenders healthier. You can enjoy that crispy texture without feeling weighed down. Your cooking will feel guilt-free.
But, you still need a little fat for the coating to adhere. A light spray or brush of oil helps immensely. It ensures the coating gets nice and golden.
Perfect Texture
The goal is tender chicken and a crisp coating. This happens when the air fryer cooks them evenly. It's a science of hot air and timing.
Too much moisture on the outside can make the coating soggy. You want your chicken dry before you bread it. This helps everything stick better.
So, pat your chicken tenders dry. This is a small step with a big impact on texture. You will taste the difference.
Even Cooking Surface
An air fryer cooks by circulating hot air. This means you cannot overcrowd the basket. Doing so blocks the airflow.
Your tenders need space to get evenly crispy. If they are piled up, the ones on the bottom will steam instead of crisp. You want them all cooked the same.
So, cook in batches if you have to. It's worth the extra few minutes. Your final result will be much better.
Choosing the Right Cut
Chicken tenders are already the perfect shape. They are lean and cook quickly. You can also use thinly sliced chicken breast.
Ensure your pieces are roughly the same size. This is important for even cooking. If you have some big and some small, they won’t finish at the same time.
Your best bet is to buy pre-cut tenders. They are convenient. If cutting your own, aim for uniform thickness.
This H2 is about understanding the basics of why air frying makes chicken tenders so great. You've learned why the coating is important, how speed affects cooking, the benefit of less oil, and the impact of even cooking. This sets you up for success before you even start.
Cooking Tenders in the Air Fryer Step by Step
Now, let's get these tenders cooked. You will follow these steps for crispy, juicy results. Your air fryer will do the heavy lifting.
Prepare Your Tenders
Start with good quality chicken tenders. Pat them completely dry with paper towels. This step is crucial for a crispy coating. You want no moisture clinging to the chicken.
Next, season your chicken. A little salt and pepper goes a long way. You can also add garlic powder or paprika for extra flavor. Your taste preferences matter here.
Once seasoned, you are ready for breading. This involves dipping the chicken in flour, then egg wash, and finally your breading mixture. Make sure each tender is fully coated. You want a nice, even layer.
Set Up Breading Station
Create three shallow dishes for your breading. The first should have seasoned flour. The second should have whisked eggs, maybe with a splash of milk or water. The third dish holds your breadcrumbs, panko, or a seasoned flour-cornmeal mix. You will dip the chicken through these stations.
Dip each tender first into the flour, shaking off any excess. Then, dip it into the egg wash, letting any extra drip off. Finally, press the tender into the breadcrumb mixture, coating all sides thoroughly. Your breading needs to stick well for crispiness.
Place the breaded tenders on a plate or a wire rack. Do not stack them. If you are not cooking them immediately, you can refrigerate them for about 15-30 minutes. This helps the coating set.
Preheat Your Air Fryer
Preheating your air fryer is very important. It ensures the cooking temperature is stable when you add the food. This helps your tenders cook evenly and develop a crisp crust right away. Most air fryers have a preheat setting. You can also run it empty for about 3-5 minutes at your target temperature.
Set your air fryer to 375°F (190°C). This temperature is ideal for cooking chicken tenders to perfection. It's hot enough to crisp the coating quickly without burning it. Your goal is golden brown and delicious.
Wait until the air fryer signals that it is preheated. Some models beep, others have a light that turns off. Your tender's coating will start cooking immediately upon hitting the hot basket.
Arrange Tenders in Basket
Place your breaded chicken tenders in the air fryer basket in a single layer. Do not overcrowd the basket. This is extremely important for achieving maximum crispiness. Air needs to circulate around each tender. If they are too close together, they will steam rather than fry.
You might need to cook your tenders in batches. This depends on the size of your air fryer and how many tenders you are cooking. It is better to cook them in two batches than to have them crammed together. Your results will thank you for this.
If you are cooking a larger batch, you can place the cooked tenders on a wire rack in a warm oven (around 200°F or 95°C) while you cook the remaining ones. This keeps them warm and crisp.
Cook and Flip Tenders
Cook the tenders for 10-12 minutes. The exact time will depend on their thickness and your air fryer model. You want them to be golden brown and cooked through. Your tenders need to reach an internal temperature of 165°F (74°C).
About halfway through the cooking time, usually around 5-6 minutes, carefully open the air fryer basket and flip the tenders over. This ensures both sides get equally crispy. You can use tongs to gently turn them. Use a tool that won't puncture the coating too much.
Keep an eye on them during the last few minutes. Air fryers can vary in intensity. You want them perfectly golden, not burnt. Your kitchen may start smelling amazing.
Check for Doneness
The best way to know if your chicken tenders are done is by using a meat thermometer. Insert it into the thickest part of a tender. It should read 165°F (74°C). This guarantees the chicken is safely cooked. You want juicy chicken.
Visually, they should be golden brown. The coating should look crisp and set. If you do not have a thermometer, you can cut into one of the larger tenders. The inside should be white and opaque, with no pinkness. Your patience will be rewarded.
If they are not quite done after 12 minutes, put them back in for another 1-2 minutes. Check them again. You want them perfectly cooked every time.
This part walks you through the actual cooking process. You've learned how to prepare the chicken, set up your breading, preheat the machine, arrange the tenders properly, cook them with a flip, and confirm they are done. Follow these steps carefully for fantastic results.
Serving and Flavor Ideas
What you serve them with and how you flavor them can change everything. Your choice of dipping sauce is key. Consider how you want to present this meal.
Dipping Sauces
The classic pairing for chicken tenders is dipping sauce. Ketchup and honey mustard are always popular choices. BBQ sauce is another favorite for many. You can also get creative with your own homemade sauces.
Consider a creamy ranch or a spicy sriracha mayo. Aioli, with garlic and lemon, also works beautifully. Your chosen sauce can elevate the entire dish. Think about what flavors you are craving.
Have a variety of sauces available if you are serving a group. This gives everyone options. Your guests will appreciate the thought.
Seasoning Blends
Beyond the breading, you can add flavor to the chicken itself. A simple blend of salt, pepper, and garlic powder is a good start. You can also experiment with paprika, onion powder, or a touch of cayenne for heat.
Consider adding dried herbs like parsley or oregano to your breadcrumb mix. You can also toss the cooked tenders with buffalo sauce or a teriyaki glaze for a different flavor profile. Your taste buds will be delighted.
Remember to taste your breading mixture before you use it. Adjust the seasonings to your liking. You are the chef, after all.
Side Dish Pairings
What goes well with chicken tenders? Classic sides include french fries or potato wedges. Coleslaw is another excellent choice, offering a creamy, tangy contrast. A simple green salad provides a fresh counterpoint.
You can also serve them with mac and cheese for a hearty meal. Or, try roasted vegetables like broccoli or asparagus. Your side dishes can complement the tenders perfectly. Think about balance.
Consider the occasion. For a quick weeknight meal, keep the sides simple. For a gathering, you might want something a bit more elaborate.
Kid-friendly Options
Kids usually love chicken tenders. Keep the seasonings simple for them, focusing on salt and pepper. Offer mild dipping sauces like ketchup or honey mustard. You want to make sure they enjoy their meal.
You can cut the cooked tenders into smaller pieces if needed. Serve them alongside some fruit salad or veggie sticks. Make it a fun meal for your little ones. They will ask for them again.
Keep the spice level low unless you know they like it. Your focus should be on making it appealing and tasty for children.
Spicy Twists
If you love heat, add some spice to your tenders. You can mix cayenne pepper or red pepper flakes into your breadcrumb mixture. A dash of hot sauce in the egg wash also works. Your tenders will have a kick.
After cooking, you can toss them in buffalo sauce. Or, serve them with a spicy aioli. These additions give your tenders a fiery edge. You can control the heat level.
Be careful not to add too much spice if serving to others who might not handle it well. Offer a cooling side, like ranch or sour cream, to balance the heat.
This section gives you ideas for what to do with your perfectly cooked tenders. You've looked at sauces, seasonings, sides, and ways to make them kid-friendly or spicy. These options help you customize your meal.
Flavor Enhancements
Sometimes, you want your tenders to taste a little different. You can change up the breading or add a finishing touch. Your creativity can shine here.
Herb and Spice Mixes
Adding herbs and spices to your breading is easy. Try Italian seasoning for a Mediterranean flair. Smoked paprika gives a lovely color and smoky taste. Garlic powder and onion powder are staples for a reason. You can combine them for a robust flavor.
Consider adding a pinch of cumin for an earthy note, or a touch of chili powder for mild warmth. For a fresher taste, you could add finely chopped fresh parsley or chives to your breadcrumbs. Your options are nearly endless.
Remember to use about one to two teaspoons of your chosen herb or spice blend per cup of breadcrumbs. Too much can overpower the chicken. Test your mix.
Marinades Before Breading
For extra juicy and flavorful tenders, you can marinate them first. A buttermilk marinade works wonders, tenderizing the chicken and adding a subtle tang. You can also use yogurt or even pickle juice as a base. Your chicken will absorb flavor while tenderizing.
For a savory marinade, whisk together yogurt or buttermilk with Dijon mustard, garlic powder, onion powder, salt, and pepper. Submerge your chicken tenders and let them marinate in the refrigerator for at least 30 minutes, or up to a few hours. This adds a depth of flavor.
After marinating, be sure to wipe off excess marinade before breading. You want the flour and egg to adhere properly to the chicken. Too much liquid can make your coating soggy.
Glazing After Cooking
Once your tenders are cooked and crisp, you can glaze them. Toss them gently in your favorite sauce while they are still warm. This allows the sauce to coat them evenly and stick. You can use BBQ sauce, buffalo sauce, honey garlic, or teriyaki glaze. Your finished product gets a flavor boost.
Be careful not to let them sit in the glaze for too long. This can make the coating soft. Toss them just before serving. This keeps your tenders crispy.
If you are making a glaze, ensure it is not too thin. A slightly thicker glaze will coat better. You want flavor, not sogginess.
Breadcrumb Alternatives
Panko breadcrumbs give the crispiest results. But you can try other things too. Crushed cornflakes or pretzels make a crunchy coating. You can also use finely ground crackers, like Ritz. Your imagination is the limit.
For a gluten-free option, use almond flour or a gluten-free breadcrumb substitute. You can also try finely ground nuts like pecans or almonds. Just ensure they are ground to a fine consistency. This mimics breadcrumbs.
Experiment to see what you like best. Each alternative will give a slightly different texture and flavor profile. Find your favorite.
This H2 covers different ways to add flavor. You’ve explored herb and spice mixes, marinades, glazes, and alternative coatings. These ideas help you customize your chicken tenders.
Troubleshooting Common Issues
Sometimes things don’t go perfectly. Here's how to fix common problems. Your cooking should always be successful.
Soggy Coating
If your tenders come out soggy, it's usually due to moisture. This can happen if the chicken wasn’t dried well before breading. Or, if you overloaded the air fryer basket, preventing proper airflow. Your coating needs dry, circulating air to crisp up.
The fix is simple: make sure you thoroughly pat your chicken dry. Also, always cook in a single layer, batch by batch if necessary. Cooking at a slightly higher temperature for the last minute or two can also help crisp them up. You want that satisfying crunch.
Avoid overcrowding the basket at all costs. It’s the most common reason for soggy results. Give your tenders space.
Uneven Cooking
Unevenly cooked tenders often result from inconsistent size or overcrowding. If your tenders are different sizes, the smaller ones cook faster. Overcrowding also blocks hot air circulation, leading to pale spots. Your air fryer needs space to work its magic.
Ensure all your tenders are roughly the same size before cooking. Then, arrange them in a single layer. Flip them halfway through. This ensures both sides cook evenly. Your results will be consistent.
If some pieces are done before others, remove the cooked ones and let the rest continue. This prevents overcooking.
Coating Falling Off
If your breading falls off, it means it didn’t adhere properly. This can happen if the chicken was too wet. Or, if you didn’t press the breadcrumbs firmly onto the chicken. The egg wash is key to making the breading stick.
To fix this, make sure your chicken is very dry. Double-dip through the egg wash and breadcrumbs for a thicker coating. Press the breadcrumbs on firmly. Your coating should stay put.
You can also let the breaded tenders rest for about 15-30 minutes before cooking. This helps the coating set and adhere better.
Chicken Undercooked
If your chicken tenders are undercooked inside, it means they didn’t reach the safe internal temperature of 165°F (74°C). This is often due to cooking them at too low a temperature or for too short a time. You must cook them thoroughly. Your health is important.
Increase the cooking time or slightly raise the temperature. Always use a meat thermometer to check. Insert it into the thickest part of the tender. This is the most reliable way to know they are done.
Never guess when it comes to chicken. Always cook it until it reaches a safe temperature.
Overcooked and Dry
If your tenders are dry, they were likely overcooked. This happens when the cooking time is too long or the temperature is too high. Air fryers cook fast, so it is easy to go too far. Your chicken can go from perfect to dry quickly.
Reduce the cooking time by a minute or two. Check for doneness earlier. You can always cook them a bit longer if needed. Using a meat thermometer helps prevent this.
Also, ensure you are not cooking very small, thin tenders for the full duration. Adjust time based on size.
Burnt Coating
A burnt coating usually means the temperature was too high or they cooked too long. The breadcrumbs, especially, can burn quickly. Your tenders may be cooked inside but ruined on the outside. This is a disappointing outcome.
Try lowering the air fryer temperature slightly, perhaps to 350°F (175°C). Also, keep a closer eye on them during the last few minutes of cooking. If parts are browning too fast, you can loosely tent them with foil.
Ensure your breading mixture is not too dark, like adding too much paprika or dark spices. This can sometimes contribute to burning.
This section helps you tackle common issues. You’ve learned how to fix soggy coatings, uneven cooking, breading that falls off, undercooked or overcooked chicken, and burnt exteriors. With these tips, you can rescue your meal.
Air Fryer Chicken Tender Reference
| Food Item / Prep Style | Temperature & Time | Key Tip to Watch For |
|---|---|---|
| Plain Chicken Tenders | 375°F (190°C) for 10-12 min | Ensure single layer, flip halfway |
| Battered Chicken Tenders | 375°F (190°C) for 12-14 min | Watch for coating browning too fast |
| Panko-Crusted Tenders | 380°F (195°C) for 9-11 min | Panko gets very crispy, check early |
| Breaded Chicken Strips | 375°F (190°C) for 11-13 min | Ensure coating is golden brown |
| Spicy Seasoned Tenders | 375°F (190°C) for 10-12 min | Watch for spices burning on coating |
| Frozen Chicken Tenders | 390°F (200°C) for 14-16 min | Do NOT thaw, cook from frozen |
Frequently Asked Questions
Is It Better to Bake or Air Fry Chicken Tenders?
Air frying is generally better for chicken tenders. You get a crispier coating with less oil than baking. Your tenders will taste closer to fried ones.
Can You Cook Frozen Chicken Tenders in the Air Fryer?
Yes, you can cook frozen chicken tenders in the air fryer. Do not thaw them first. You will need to increase the cooking time slightly. Your frozen tenders should cook through perfectly.
Are Air Fryer Chicken Tenders Healthy?
Air fryer chicken tenders are healthier than deep-fried versions. You use much less oil. The final result is still crispy and delicious. You can feel good about eating them.
Do You Need to Preheat the Air Fryer for Chicken Tenders?
Yes, preheating your air fryer is recommended for chicken tenders. It ensures they start cooking immediately at the right temperature. This helps create a crispier coating. Your tenders will be more evenly cooked.
How Do You Keep Chicken Tenders Crispy in the Air Fryer?
To keep your tenders crispy, avoid overcrowding the basket. Cook them in a single layer and flip them halfway. Your tenders need space for air to circulate. This is the key to crispiness.
Should You Use Oil on Breaded Chicken Tenders in the Air Fryer?
Yes, a light spray or brush of oil on breaded chicken tenders helps achieve a golden brown, crispy coating. It is not strictly necessary, but it significantly improves the texture and appearance. You will see a noticeable difference.
Will Chicken Tenders Get Crispy If I Overcrowd the Basket?
No, chicken tenders will not get crispy if you overcrowd the basket. They will steam instead of crisping up. Proper airflow is essential for crispy results. Your tenders need space.
How Long Does It Take to Cook Chicken Tenders in an Air Fryer?
It typically takes 10-14 minutes to cook chicken tenders in an air fryer at 375°F (190°C). The exact time depends on the thickness of the tenders and your specific air fryer model. Always check for doneness.
Final Thoughts
I hope this guide has made cooking perfect chicken tenders in your air fryer simple. You can now achieve that ideal crispy-tender balance without the mess. Your next meal will be a success. Enjoy your delicious creation.
