
As an Amazon Associate, I earn from qualifying purchases at no extra cost to you.
How to Cook Duck Breast in Air Fryer (15-20 Minutes)

Your air fryer is ready, and you’re holding a duck breast. You want that skin perfectly crispy, the meat tender and juicy, and you want it fast. Forget complicated pans and messy stovetops; the air fryer is your best friend for this. I will show you exactly how to get restaurant-quality results at home in no time.
The secret to amazing air fryer duck breast is controlling the heat and giving the fat a chance to render properly. You need to score the skin deeply, then let the air fryer do the work. Your goal is crispy skin without overcooking the meat. I have perfected this method over many attempts, and your duck breast will come out beautifully.
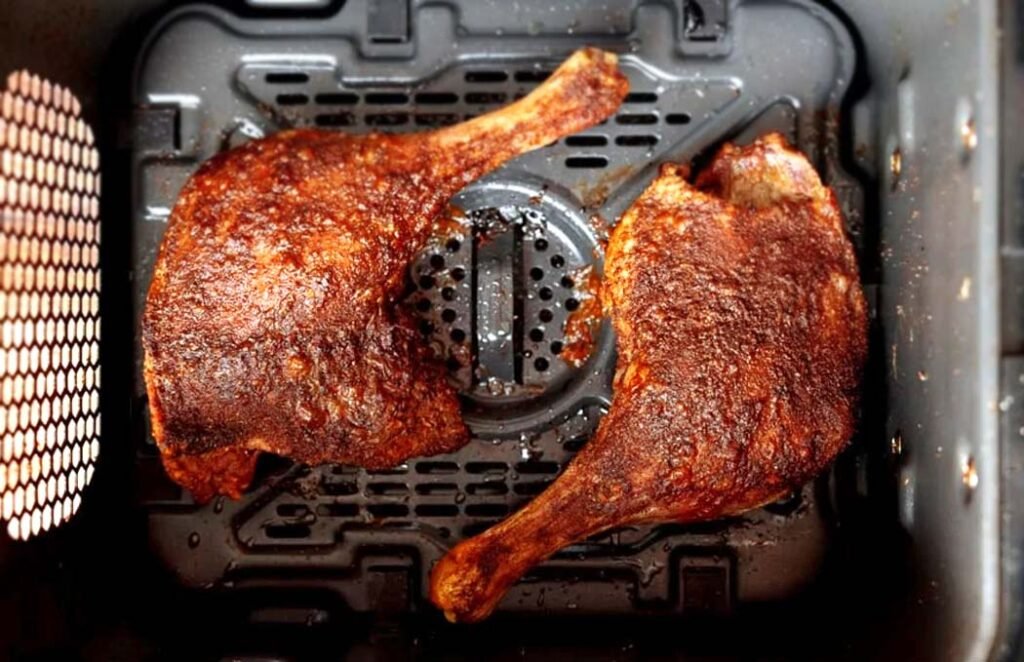
Why Air Frying Duck Breast Works So Well
Your air fryer offers a unique advantage for cooking duck breast, turning it into a simple, quick meal. It mimics roasting but with circulating hot air that crisps the skin while cooking the meat through. This machine is perfect for getting that desired texture without the fuss.
Render That Fat
Duck breast has a thick layer of fat under the skin. This fat needs heat to melt and crisp up. If you don’t render it correctly, your duck will taste greasy. The air fryer's intense heat does a fantastic job of this.
You want to give that fat a clear path to escape. Scoring the skin helps the rendered fat drain away, making the skin super crispy. Your air fryer basket catches the drippings.
Always start with a cold or barely warmed pan if pan-searing. But for the air fryer, you will start with preheating it. This initial blast of heat is key to rendering the fat from the outside in.
Crispy Skin is Key
The ultimate goal with duck breast, especially when you're cooking it, is that shatteringly crisp skin. It's the best part for many people. A soggy skin is just a disappointment.
Air frying excels here because the hot air constantly surrounds the duck breast. This hot air blows away moisture from the skin's surface, helping it turn golden and crisp. You avoid the steam effect you can get in a covered pan.
Make sure your duck breast skin is completely dry before you score it. Moisture is the enemy of crispiness. Pat it very, very dry with paper towels.
Speed and Simplicity
Traditional methods for duck breast can take a while and require careful attention. Pan-searing, then oven finishing, demands timing. Your air fryer cuts that time down dramatically.
You can go from raw duck breast to a perfectly cooked meal in under 20 minutes. This makes it a great option for a weeknight dinner when you want something special. Your air fryer makes it easy.
Just remember to adjust your cooking time based on the thickness of your duck breast. Thinner breasts cook faster than thicker ones.
Perfect Medium-rare
Duck breast is best enjoyed medium-rare. Overcooking it makes the meat tough and dry, like shoe leather. You want that beautiful pink center.
The air fryer allows for precise temperature control. This helps you hit that perfect medium-rare mark without accidentally going too far. Your thermometer is your best friend here.
Aim for an internal temperature of around 135°F (57°C) for medium-rare. It will continue to cook a bit as it rests.
Scoring the Skin
This step is non-negotiable for crispy duck skin. You need to carefully cut through the fat layer without hitting the meat. This helps the fat render out.
Use a very sharp knife or a box cutter. Make parallel lines about half an inch apart across the entire skin side. Then, make diagonal cuts in the opposite direction to create a diamond pattern.
Be gentle, you don’t want to pierce the muscle underneath. Just go through the fat. Your score marks will open up during cooking.
Seasoning Basics
While duck has a rich flavor on its own, a little seasoning goes a long way. Salt and pepper are essential. You can add other spices if you like.
Make sure you season both sides of the duck breast. But pay extra attention to the skin side after scoring. The salt helps draw out moisture.
For a simple but delicious result, just use kosher salt and freshly ground black pepper. This lets the natural duck flavor shine.
Cooking duck breast in the air fryer is surprisingly simple. You just need to get a few key steps right. Your air fryer will do the heavy lifting.
- Always score the duck skin before cooking.
- Pat your duck breast completely dry.
- Preheat your air fryer.
- Place the duck breast skin-side down first.
- Cook until the skin is golden brown and crispy.
- Let it rest before slicing.
Cooking Duck Breast Step-by-step
This guide walks you through cooking duck breast in your air fryer. Follow these steps and you will get a delicious, crispy-skinned result every time. Your air fryer will turn raw duck into a gourmet meal.
Prep Your Duck
Before you even think about turning on your air fryer, you need to prep the duck breast. This involves drying it thoroughly and scoring the skin. This preparation step is critical for achieving that perfect texture. You want to see that fat render out beautifully.
Take your duck breast and pat it completely dry on all sides with paper towels. Any moisture left on the skin will steam, preventing crispiness. Then, using a very sharp knife, score the skin in a diamond pattern. Be careful to only cut through the fat, not into the meat itself. This allows the fat to render out during cooking.
Your scoring should be about a quarter-inch deep, creating lines about half an inch apart. After scoring, season generously on both sides with salt and freshly ground black pepper. Make sure some of the seasoning gets into those score marks. This initial prep work sets you up for success.
Preheat the Air Fryer
Just like with most air fryer recipes, preheating your machine is essential. It ensures the duck breast starts cooking immediately and evenly. This blast of hot air helps kickstart the fat rendering process right away. You want your air fryer to be hot.
Set your air fryer to 400°F (200°C). Let it preheat for about 3 to 5 minutes. You don’t need to add any oil to the air fryer basket when cooking duck breast. The duck's own fat is enough.
Make sure you follow your air fryer's specific instructions for preheating. Some have a preheat button, others just need you to run it empty for a few minutes. Your duck breast deserves a hot start.
Cook Skin-side Down
Place your seasoned duck breast into the preheated air fryer basket, skin-side down. This orientation is crucial for allowing the fat to render effectively. The heat from the air fryer will melt that fat, making the skin incredibly crispy. Your air fryer will manage the heat.
Cook for about 8 to 10 minutes at 400°F (200°C). The exact time will depend on the thickness of your duck breast and your air fryer model. You should see the skin starting to turn golden brown and crisp up. Keep an eye on it to avoid burning.
If you notice a lot of smoke, it might be because too much fat is dripping. You can carefully remove the basket, discard some of the rendered fat, and wipe down the bottom of the basket. Your goal is crispy skin, not a smoky kitchen.
Flip and Finish
After the initial cooking time, carefully flip the duck breast over using tongs. Now the meat side is facing down. You want to finish cooking it on this side until it reaches your desired doneness. Your thermometer is key here.
Continue cooking at 400°F (200°C) for another 5 to 8 minutes. For medium-rare, aim for an internal temperature of 135°F (57°C) measured in the thickest part of the breast. If you prefer it more well-done, cook it a few minutes longer, but be careful not to overcook.
Always use an instant-read thermometer to check for doneness. Relying solely on time can lead to overcooked or undercooked meat. Your perfect duck breast depends on accuracy.
Rest the Duck
Once your duck breast reaches the target temperature, remove it from the air fryer basket. Place it on a clean cutting board. Now comes another critical step: letting it rest. This step is very important.
Let the duck breast rest for at least 5 to 10 minutes before slicing. This allows the juices to redistribute throughout the meat. If you slice it too soon, all those delicious juices will run out onto the cutting board. Your duck will be drier.
Tent it loosely with foil while it rests. This keeps it warm without steaming the crispy skin. Your patience will be rewarded with a more tender and flavorful duck.
Slice and Serve
After resting, you can slice your duck breast. Use a sharp knife and slice it against the grain. You will notice how tender and juicy the meat is. Your effort has paid off.
Serve your perfectly cooked air fryer duck breast immediately. It pairs wonderfully with a variety of side dishes, such as roasted vegetables, mashed potatoes, or a simple salad. You have created a fantastic meal.
Enjoy your delicious, crispy-skinned duck breast. It's a restaurant-quality dish made easily in your own kitchen. Your friends and family will be impressed.
Serving Duck Breast
Duck breast is a rich, flavorful meat that pairs well with many different flavors and textures. Thinking about what to serve alongside it can elevate your entire meal. Your air fryer duck breast deserves a great supporting cast.
Fruit Pairings
The richness of duck breast is wonderfully complemented by the sweetness and acidity of fruit. Think of classic combinations like duck with cherry sauce or orange sauce. Your air fryer duck will benefit from this contrast.
You can make a quick pan sauce using fruit preserves or fresh fruit. A simple reduction with a splash of balsamic vinegar works beautifully too. Your palate will thank you for the sweet and savory balance.
Consider serving it with a side of roasted apples or pears. A cranberry or fig relish also offers a bright, tangy counterpoint. Your meal becomes more interesting with these additions.
Earthy Vegetables
Earthy vegetables provide a grounding, savory element that balances the richness of the duck. Root vegetables are particularly good choices. Your air fryer duck needs these flavors.
Roasted root vegetables like parsnips, sweet potatoes, or carrots complement duck very well. You could even roast them in the air fryer alongside the duck if you have space. Your side dish is ready.
Mushrooms, especially wild varieties like shiitake or cremini, also offer a deep, earthy flavor that matches duck beautifully. Sautéed mushrooms make an excellent topping.
Grains and Starches
A good starch or grain can provide a satisfying base for your duck breast. It helps soak up any delicious pan juices or sauce. Your duck breast needs something to rest on.
Creamy mashed potatoes, a simple risotto, or a wild rice pilaf are all excellent choices. They offer a comforting texture and absorb flavors well. Your plate will look and taste complete.
Consider a farro or quinoa salad for a lighter, more textured option. A polenta base is also a fantastic way to serve duck.
Simple Salads
Sometimes, a light, fresh salad is all your rich duck breast needs. It cuts through the fattiness and adds a refreshing element to the plate. Your taste buds will appreciate the contrast.
A simple green salad with a light vinaigrette is always a good idea. Add some toasted nuts or a sprinkle of goat cheese for extra flavor. Your duck dish feels lighter.
Consider a peppery arugula salad with a lemon-based dressing. The peppery notes of arugula and the bright citrus work wonderfully with duck.
What to Avoid
Cooking duck breast in the air fryer is straightforward, but a few common mistakes can ruin your results. Being aware of these pitfalls will help you achieve that perfect crispy skin and juicy meat. Your duck deserves better than a mistake.
Skipping the Score
This is probably the most common mistake people make. They either forget to score the duck skin or don’t do it deeply enough. This prevents the fat from rendering properly. Your duck will end up greasy and not crispy.
The fat layer needs a way to escape the skin. Scoring creates channels for that fat to melt and drain away. If you don’t do this, the fat stays trapped, leading to a chewy, unappetizing skin. Always score your duck.
If you are hesitant, practice on a piece of parchment paper first. You want to see the fat, not the red meat. Your sharp knife is your tool here.
Not Drying the Skin
Another critical step that people often overlook is thoroughly drying the duck breast before cooking. Moisture is the enemy of crispiness. Your skin will steam instead of crisp if it’s wet.
Use paper towels to pat the duck breast completely dry on all sides. Pay special attention to the skin. The drier the skin is, the crispier it will get in the air fryer. This simple step makes a huge difference.
Don’t rush this part. If you have time, you can even leave the duck uncovered in the fridge for an hour or two to help dry out the skin further. This helps you get that perfect texture.
Overcooking the Duck
Duck breast is best served medium-rare. Cooking it past that point makes the meat tough and dry. You want that beautiful pink color. Your duck breast is delicate.
It cooks quickly in the air fryer, so it's easy to overdo it. Always use an instant-read thermometer to check the internal temperature. Aim for 135°F (57°C) for medium-rare. It will continue to cook as it rests.
Remember that duck breast continues to cook for a few minutes after you remove it from the air fryer. Take it out when it's a few degrees below your target temperature.
Crowding the Basket
Just like with most air fryer recipes, you should not overcrowd the basket. If you put too many duck breasts in at once, they will steam instead of crisp. Your air fryer needs space.
Make sure there is enough space around each duck breast for the hot air to circulate freely. If you are cooking for more than two people, you might need to cook them in batches. Your results depend on good airflow.
Overcrowding leads to uneven cooking and results in chewy, flabby skin. It defeats the purpose of using the air fryer for crispiness. Cook in batches if needed.
Air Fryer Duck Breast Summary
This table provides a quick reference for cooking duck breast in your air fryer. Remember that times may vary slightly based on your specific air fryer model and the thickness of your duck breast. Always use a meat thermometer for best results.
| Preparation | Temperature & Time | Key Tip |
|---|---|---|
| Duck Breast (Scored) | 400°F (200°C) for 8-10 min (skin down) | Score skin deeply; pat dry before cooking |
| 400°F (200°C) for 5-8 min (skin up) | Aim for 135°F (57°C) internal for medium-rare | |
| Rest for 5-10 minutes | Allow juices to redistribute before slicing |
Frequently Asked Questions
How Do You Score Duck Breast for the Air Fryer?
Score the duck skin deeply in a diamond pattern, about a quarter-inch deep, without cutting into the meat. This allows the fat to render, leading to crispy skin. Your sharp knife is key here.
Can You Cook Frozen Duck Breast in the Air Fryer?
It's best to thaw your duck breast completely before cooking it in the air fryer. While some air fryer recipes work with frozen items, duck breast requires specific attention to fat rendering and doneness that is difficult to achieve from frozen. You will get better results if it’s thawed.
Does Duck Breast Need Oil in the Air Fryer?
No, you do not need to add extra oil when cooking duck breast in the air fryer. The duck breast has plenty of its own fat that will render out during cooking, creating its own natural cooking medium. Your duck will be perfectly fine.
What Temperature Should I Cook Duck Breast To?
For a perfect medium-rare duck breast, aim for an internal temperature of 135°F (57°C). If you prefer it more well-done, you can cook it up to 145°F (63°C), but be cautious as it can become tough. Always use a meat thermometer to verify your duck’s doneness.
How Long Should Duck Breast Rest After Air Frying?
You should let your air-fried duck breast rest for at least 5 to 10 minutes after removing it from the air fryer. This resting period allows the juices to redistribute evenly throughout the meat, ensuring it remains moist and tender when you slice it. Your patience pays off.
What If My Air Fryer Smokes When Cooking Duck?
If your air fryer smokes heavily, it's usually due to excess rendered fat dripping onto the heating element or into the bottom of the basket. Carefully remove the basket, discard the excess fat, and wipe down the interior if necessary before continuing. Your duck will cook better with less smoke.
Is It Okay to Cook Multiple Duck Breasts at Once?
It is best to cook duck breasts in a single layer with space between them for proper air circulation. If you crowd the basket, the duck will steam rather than crisp. You might need to cook them in batches if you are making several.
What Does Crispy Duck Skin Taste Like?
Crispy duck skin has a satisfying crunch and a rich, savory flavor. It’s often described as being similar to perfectly cooked bacon but with a deeper, meatier taste. Your air fryer can achieve this texture beautifully.
Final Thoughts
I hope this guide has made cooking duck breast in your air fryer seem easy. You can achieve incredibly crispy skin and tender, juicy meat right in your kitchen. Your confidence will grow with each successful cook.
