
As an Amazon Associate, I earn from qualifying purchases at no extra cost to you.
How to Sharpen a Bread Knife with a Whetstone the Easy Way
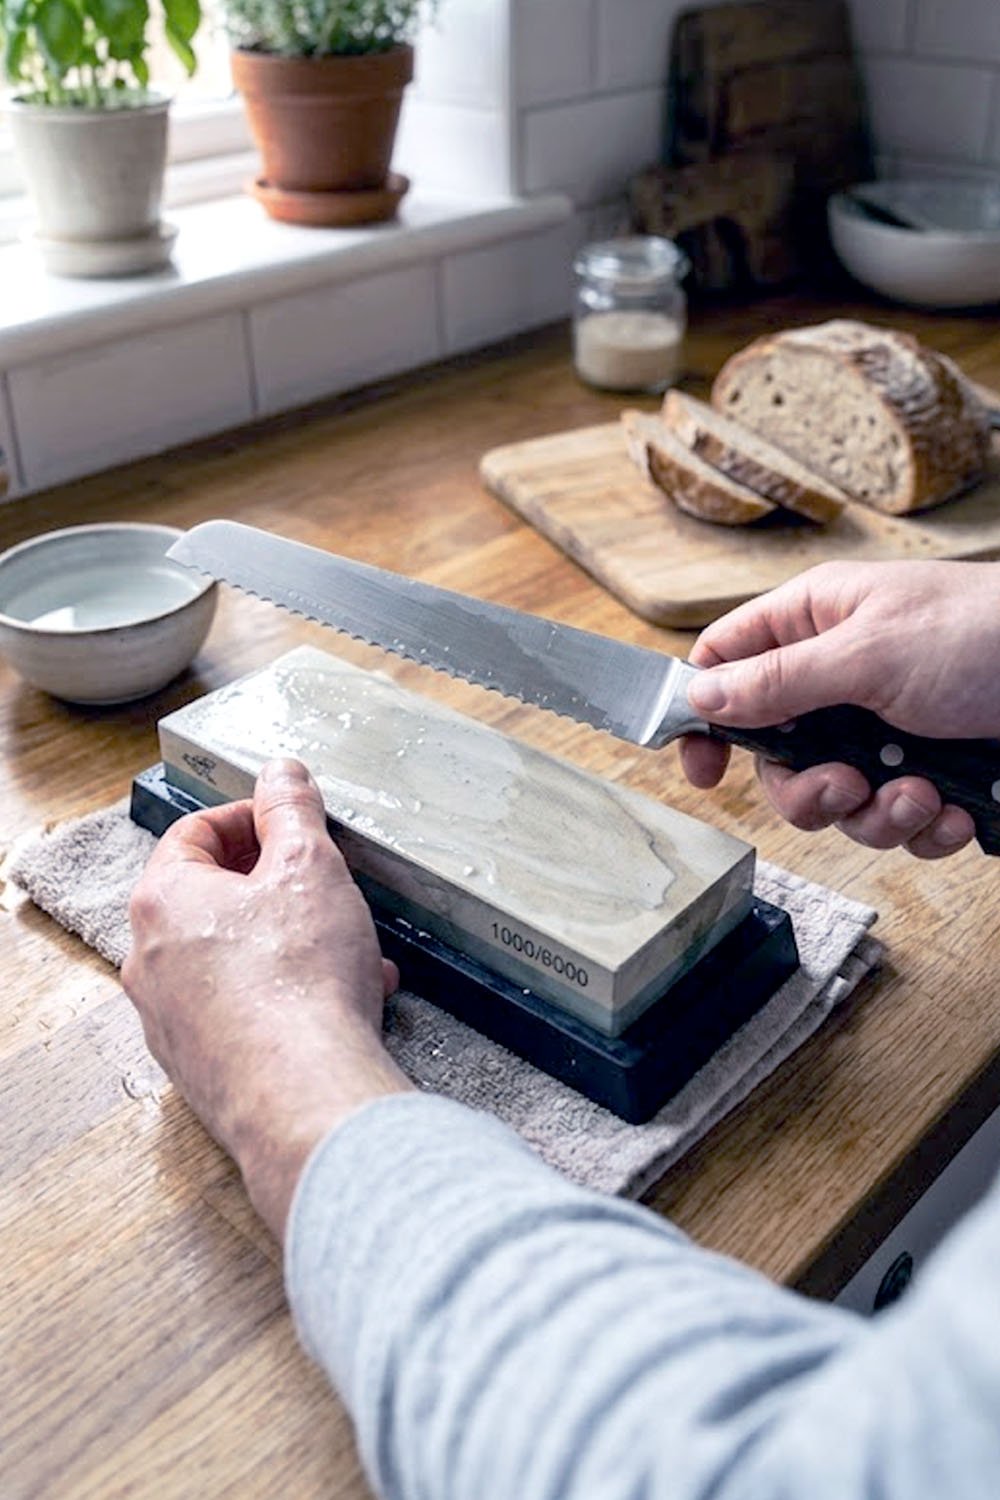
I used to think my serrated blade was basically a disposable tool until I actually tried fixing it myself. Most people just toss their bread knives when they stop cutting through crust, which is a total waste of money. In this guide, you will learn how to sharpen a bread knife with a whetstone so you can get those perfect, clean slices every single time.
To get started, you need to soak your stone in water for about ten minutes until the bubbles stop appearing. Find the side of the blade with the angled bevels because you only ever work on that specific side. Use a ceramic rod or the very edge of your whetstone to fit inside each individual tooth of the knife. Stroke away from the edge carefully to remove the dull metal while keeping a consistent angle. Finally, flip the knife over to gently shave off any tiny metal burrs from the flat back side.
Is It Really Possible to Sharpen a Serrated Blade at Home?
Many folks believe that once those little teeth go dull, the knife is finished. I used to be one of them, honestly. It feels like a daunting task because there are so many tiny grooves to deal with instead of a single straight edge. However, I found out that with just a bit of patience and the right technique, you can make it even sharper than when it was brand new.
The trick is focusing on the individual scallops rather than the whole blade at once. If you try to run it across a flat stone like a chef knife, you will just ruin the serrations. You have to treat each little valley like its own tiny project. It takes a little longer, but the results are so worth it when you feel that blade glide through a soft loaf.
Most bread knives only have a grind on one side of the metal. This makes your job much easier because you do not have to worry about matching angles on both sides. You just need to follow the factory edge that is already there. If you look closely, you can see exactly where the manufacturer ground the metal down.
Once you get into a rhythm, the process becomes almost relaxing. You just sit there with your stone and your knife, working tooth by tooth. Before you know it, that old “useless” tool is back in action and ready for a fresh baguette. It is a great way to save a favorite kitchen tool from the trash bin.
- Check if your knife has a single or double bevel.
- Always soak your whetstone until it is fully saturated.
- Find a comfortable spot with plenty of light to see the teeth.
- Move slowly to avoid slipping and hurting your fingers.
- Keep the stone wet throughout the entire sharpening process.
- Test the sharpness on a piece of paper or a soft tomato.
How to Sharpen Your Bread Knife with a Whetstone Step by Step
Preparing Your Stone and Workspace
Setting up your area is the first thing you need to do before touching the blade. I always place a damp kitchen towel under my whetstone to keep it from sliding around on the counter. This provides a stable base so you can focus entirely on your hand movements. If the stone moves while you are working, you might mess up the angle or even cut yourself.
Make sure your stone is nice and wet by dunking it in a bowl of water for a while. You will know it is ready when the surface stays shiny and does not soak up the moisture instantly. Keep a small spray bottle or a cup of water nearby to keep things lubricated. A dry stone will create too much heat and could potentially damage the tempered steel of your knife.
Lastly, clear away any clutter from your workspace so you have plenty of room for your arms to move. You want to feel relaxed and not cramped up while you work. Lighting is also super important here because you need to see the tiny details of the serrations. A good desk lamp or a bright kitchen light will make the whole job much easier to manage.
- Place a wet towel under the stone for grip.
- Soak the whetstone for at least ten minutes.
- Keep extra water handy for constant lubrication.
- Ensure the area is bright and well lit.
Identifying the Beveled Side of the Blade
Take a close look at your bread knife and notice how it is shaped. Most of these knives are only ground on one side, while the other side is completely flat. This design is what allows the knife to saw through tough crusts without crushing the soft bread inside. You must only sharpen the side that has the visible slanted edge in the teeth.
If you try to sharpen the flat side, you will end up destroying the geometry of the tool. I usually run my thumb very carefully across the flat back to feel for any rough spots. The side with the dips and valleys is where all the magic happens. Identifying this correctly from the start saves you a lot of headache and prevents permanent damage.
Sometimes it helps to use a permanent marker to color in the serrations before you start. This little trick shows you exactly where the stone is hitting the metal as you work. As the marker wears off, you can see if your angle is correct or if you need to adjust. It is a lifesaver for beginners who are still getting a feel for the metal.
- Locate the slanted edge on the serrated teeth.
- Check if the back side of the blade is flat.
- Use a marker to track your progress on the metal.
- Never sharpen the flat side of the bread knife.
Choosing the Right Edge of the Stone
Since a whetstone is usually a big rectangular block, you cannot just lay the knife flat on it. Instead, you need to use the sharp 90 degree corner of the stone to reach into the serrations. This allows the stone to act like a file that fits perfectly into each individual curve. It might feel a bit awkward at first, but you will quickly get the hang of the motion.
Alternatively, some people prefer using a ceramic sharpening rod if their whetstone is too thick. However, if you are careful, the edge of a fine grit stone works beautifully for this job. You want to make sure the corner of the stone is not chipped or cracked. A smooth edge will give you a much cleaner finish on the steel.
Angle the knife so that the corner of the stone sits snugly in the first scallop near the handle. You are looking for a match between the shape of the stone and the curve of the tooth. If the stone is too wide, just use the very tip of the corner. This precision is what brings the “bite” back to your favorite bread knife.
- Use the corner edge of the whetstone for the teeth.
- Match the stone angle to the factory serration curve.
- Start from the heel of the knife near the handle.
- Ensure the stone edge is smooth and free of chips.
Using the Proper Sharpening Motion
Once you are lined up, start moving the knife in a slow and steady rhythm. You should push the blade away from your body while maintaining that specific angle. I like to think of it as a gentle scrubbing motion that follows the curve of the metal. Do not use too much pressure because the stone does most of the heavy lifting for you.
Repeat this motion about five to ten times for every single tooth on the blade. It is a bit tedious, but skipping a tooth will leave a dull spot that snags on your bread. I usually count the strokes in my head to make sure every section gets the same amount of love. This consistency ensures the knife cuts evenly from the tip all the way to the handle.
As you work, you might notice a little grey sludge forming on the stone. This is a good sign because it means you are actually removing old, dull metal. Just keep adding a few drops of water to keep that slurry moving freely. The sound should be a consistent “shhh” noise rather than a harsh scratching sound.
- Push the blade away from you with steady pressure.
- Count your strokes for every individual serration.
- Keep the angle consistent throughout the entire process.
- Watch for the grey slurry to form on the stone.
Removing the Metal Burr from the Back
After you finish all the teeth, you will likely feel a tiny rough edge on the flat side of the knife. This is called a burr, and it is a perfectly normal part of the sharpening process. To get rid of it, lay the flat side of the blade completely flush against the surface of the whetstone. You do not want any angle at all for this part.
Gently pull the knife across the stone just a couple of times. This light touch snaps off those tiny metal fragments and leaves you with a razor sharp edge. Be very careful not to overdo it or you might accidentally create a bevel on the flat side. Two or three light passes are usually all it takes to finish the job.
I always wipe the blade down with a clean cloth after this step to see my handiwork. The edge should look shiny and feel incredibly smooth to the touch. If you still feel a few snags, you can repeat the flat side pass once more. This final touch is what makes the difference between a “okay” edge and a professional one.
- Lay the flat side of the blade flush on the stone.
- Use very light pressure to remove the metal burr.
- Only pull the blade across the stone a few times.
- Wipe the blade clean to inspect the final edge.
Testing and Cleaning Your Refreshed Knife
Now comes the fun part where you get to see if all that hard work paid off. I usually grab a piece of scrap paper and see if the knife can slice through it without tearing. If it zips through easily, you have done a fantastic job. Another great test is a ripe tomato because serrated knives should slice through the skin with zero effort.
Before you go off to slice a fresh loaf of sourdough, make sure to wash the knife thoroughly. You do not want any tiny metal bits or stone grit getting into your food. Use warm soapy water and a sponge, but be extra careful since the knife is now much sharper than before. Dry it immediately with a towel to prevent any rust spots from forming.
Store your newly sharpened knife in a block or a sheath to keep the edge protected. If you just toss it in a drawer with other utensils, the teeth will get banged up and go dull again quickly. Taking care of your tools means they will take care of you for years to come. You should feel proud that you mastered a skill most people avoid.
- Test the edge on a piece of paper or a tomato.
- Wash the blade with soap to remove metal shavings.
- Dry the knife immediately to avoid any rust.
- Store the knife properly to protect the new edge.
Can You Use a Pull Through Sharpener for a Bread Knife?
I get asked this all the time, and the honest answer is that you really should stay away from them. Those cheap pull through gadgets are usually designed for straight blades and will absolutely munch up your serrations. They tend to shave off the points of the teeth, which eventually turns your bread knife into a weird, bumpy straight blade. It is heart breaking to see a good knife ruined that way.
Most of those sharpeners use hard carbide V-shaped notches that just do not fit into the scallops of a bread knife. When you pull the knife through, it hits the high points and ignores the valleys where the cutting actually happens. This leaves you with a knife that feels jagged but still does not cut through crust. It is a shortcut that usually ends up costing you more in the long run.
Using a whetstone or a ceramic rod is the only way to maintain the original shape that the manufacturer intended. It takes more effort, sure, but the results are incomparable. You want to preserve those sharp “teeth” because they are what allow the knife to saw through things. A pull through sharpener is basically like taking a sledgehammer to a delicate carving.
If you are in a huge rush, you might be tempted, but please try to resist. Even a few minutes with a stone is better than ten seconds in one of those plastic devices. Your bread will look better, your hands will be safer, and your knife will last a lifetime. Investing a little time in learning the right way pays off every time you hit the kitchen.
- Avoid pull through sharpeners for all serrated blades.
- Gadgets often grind down the points of the teeth.
- Manual sharpening preserves the original blade geometry.
- Standard sharpeners cannot reach the inner scallops.
- Ruined serrations are almost impossible to fix later.
- Hand sharpening is much safer for the life of the steel.
Final Thoughts
I hope this little guide helps you feel confident enough to try this out yourself. Learning how to sharpen a bread knife with a whetstone is such a rewarding skill that saves money and makes cooking way more enjoyable. Just remember to take your time, keep things wet, and respect the edge. You have totally got this, so go ahead and give that old dull blade a second chance at life!
| Step Name | Tool Needed | Motion Type | Side of Blade | Goal | Time Taken |
| Stone Soaking | Water Bowl | Submerging | N/A | Saturate Stone | 10 Minutes |
| Setup | Damp Towel | Static | N/A | Stability | 1 Minute |
| Tooth Honing | Stone Corner | Pushing Away | Beveled Side | Sharpen Teeth | 15 Minutes |
| Burr Removal | Flat Stone Surface | Pulling Flush | Flat Side | Smooth Edge | 1 Minute |
| Cleaning | Soap and Sponge | Wiping | Both Sides | Remove Grit | 2 Minutes |
| Testing | Paper or Tomato | Slicing | Both Sides | Verify Edge | 1 Minute |
Frequently Asked Questions (FAQs)
Is it hard to sharpen a serrated knife?
It is not hard at all, but it does require a bit more patience than a regular knife. You just have to work on each tooth one by one rather than all at once.
Can I use a regular whetstone for this?
Yes, you can use a regular whetstone by utilizing the sharp corner of the stone. This allows you to reach deep into the curved scallops of the serrated blade easily.
Do I need to soak the stone every time?
You should always soak a traditional whetstone before use to prevent the metal from overheating. It also helps the stone glide much smoother across the surface of the steel.
Is it okay to sharpen only the beveled side?
Absolutely, because most bread knives are designed with a single bevel. Sharpening only the angled side preserves the factory shape and keeps the knife cutting straight and true.
Can I ruin my knife if I mess up?
It is pretty hard to ruin it completely if you go slow. Even if your angle is a bit off, you can usually correct it with a few more careful strokes.
Do I need a coarse or fine stone?
A medium or fine grit stone is usually best for bread knives. You are typically just refreshing the edge rather than reshaping the entire blade from scratch.
Is it necessary to remove the burr?
Yes, removing the burr is a vital step for a clean cut. If you leave the burr on, the knife will feel “toothy” and might tear the soft bread.
Can I use oil instead of water?
Only use oil if your stone is specifically an oil stone. Most modern whetstones are designed for water, and mixing the two can actually clog up the stone pores.
