
As an Amazon Associate, I earn from qualifying purchases at no extra cost to you.
How to Sharpen Scissors With Knife Sharpener Rod (Step-by-Step)
Your scissors won’t cut clean anymore. They chew through paper, snag fabric, and leave you frustrated. You’ve probably got a honing rod sitting in your kitchen drawer right now, and you have no idea it can fix this. I’m going to walk you through exactly how to use it, step by step.
You can sharpen scissors with a knife sharpener rod by opening the blades and running each one down the rod at a 20-degree angle, moving from base to tip. Do this 8 to 10 strokes per blade, alternating sides. You’ll feel the edge grab differently when it’s working. Keep your fingers away from the blade path, and you’re done.
Why Scissors Go Dull Faster Than You Think
Scissors don’t just dull from use. Your environment, your habits, and even what you cut can wreck the edge faster than you’d expect.
Paper Dust Buildup
Most people don’t realize that cutting paper repeatedly leaves a fine residue along the blade edge. That dust packs into the cutting seam and acts like sandpaper in reverse. It doesn’t sharpen anything. It wears the edge down in an uneven, jagged way that you can feel when the scissors start dragging instead of slicing. You should wipe your blades clean after heavy paper use.
Misaligned Pivot Screw
If your scissors feel loose and wobbly at the hinge, the problem isn’t the edge at all. It’s the pivot screw. When that screw loosens, the blades spread apart during a cut instead of pressing against each other cleanly. No amount of sharpening fixes this. You need to tighten it first, usually with a small flathead screwdriver, before you even pick up the rod.
Wrong Surface Contact
Cutting on hard surfaces, like ceramic tiles or metal trays, does real damage. Micro-chips along the cutting edge happen every time the blade tip hits something harder than steel. You might not see them, but you feel them as that familiar skipping sensation mid-cut. Keep your scissors cutting only what they’re designed for, and your edges will last twice as long.
Blade Corrosion
Kitchen humidity is brutal on steel. Surface rust forming near the pivot point is one of the most common reasons scissors stop cutting cleanly. The rust creates friction, and that friction pulls the blades out of alignment. You can prevent this by drying your scissors completely before storing them, and wiping the blades with a tiny drop of food-safe oil every few months.
Single-Blade Dullness
Here’s something most people miss. Scissors don’t always go dull evenly. One blade can lose its edge while the other stays sharp. If you notice one blade dragging and the other still biting, that’s your sign. You only need to work the dull blade harder. The rod method lets you do exactly that, one blade at a time.
Material Mismatch
You’ve got fabric scissors and kitchen scissors for a reason. Using fabric shears to cut through cardboard or tape ruins the edge in minutes. The blades are ground to a finer angle than general-use scissors, and hard materials peel that edge back like a cheap knife. Match your scissors to the material, and you’ll sharpen them far less often.
How to Sharpen Scissors With Knife Sharpener Rod the Right Way
Here is the method that actually works. No guessing. No expensive tools. Just your rod and some patience.
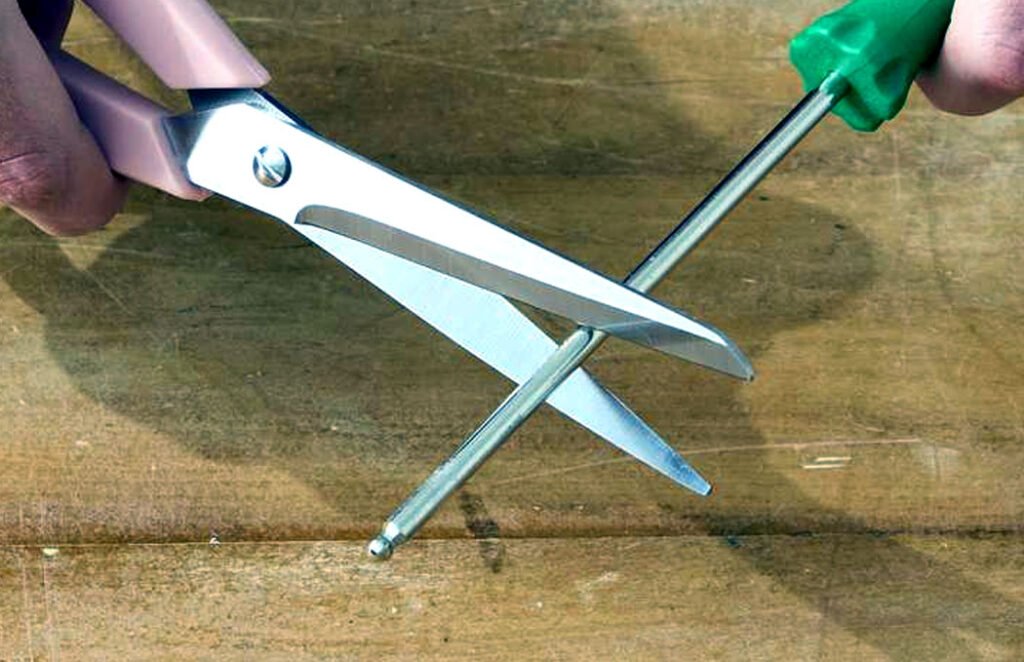
Hold the rod steady and bring the blade to it, not the other way around. You’ll get more control and a cleaner angle.
Blade Angle Setup
Before you make a single stroke, you need to get the angle right. Open the scissors fully, so both blades are spread wide. Hold the rod vertically in your non-dominant hand, tip pointing down on a folded towel. Now bring the inside face of one blade flat against the rod, then tilt it back slightly. You’re aiming for 20 degrees. That’s roughly the thickness of two stacked pennies between the spine of the blade and the rod. If you go too steep, you’ll round the edge. Too shallow, and you won’t touch the cutting bevel at all.
You can check your angle by feel. The blade should catch slightly as you draw it down, not skate freely and not dig in hard. That middle point is your target. A lot of people rush this part and then wonder why the scissors don’t feel sharper after 20 strokes. The angle is everything here.
- Draw the blade from base to tip in one smooth motion
- Keep your wrist locked, let your arm do the movement
- Check angle every 3 strokes to make sure it hasn’t drifted
Stroke Direction
Always move from base to tip. Start at the pivot end of the blade and pull down toward the tip in a single, controlled stroke. This is the opposite of how many people try it naturally, and that’s exactly why they don’t get results. Moving tip to base folds the edge back on itself instead of refining it. You want to push the metal in the direction the edge naturally tapers.
Apply light, consistent pressure. You’re not grinding. Think of it more like stroking. The rod removes a very small amount of metal each pass, so your job is to do it evenly. If you press hard on one stroke and light on the next, you end up with an uneven bevel that cuts worse than before. Keep the pressure steady, keep the angle steady, and let the strokes do the work.
- Use your full forearm, not just your wrist, for each stroke
- Count each stroke out loud if it helps you stay consistent
- Wipe the blade on a cloth after every 5 strokes to clear metal dust
Stroke Count per Blade
Do 8 to 10 strokes per blade. Not more. More strokes on a ceramic or diamond rod can remove too much metal and shorten the life of your scissors. If after 10 strokes the blade still isn’t cutting clean, the problem is something else, a burr, a nick, or a misaligned pivot. More strokes won’t solve those. You need to diagnose before you keep grinding.
After you finish one blade, do the exact same count on the other. Even if one blade feels sharper already, give both the same treatment. Scissors cut by the interaction of two edges. If one is sharper than the other, you’ll still get drag. Your goal is a matched pair, not one sharp blade and one neglected one.
- Count strokes, don’t eyeball it
- Both blades get the same number of passes
- Write it down on a piece of tape if you keep losing count
Burr Check
After your strokes, run the pad of your thumb very gently across the flat side of the blade, not along the edge. You’re feeling for a tiny wire-like ridge. That’s the burr. It forms when you sharpen any edge, and it has to come off or the scissors won’t cut cleanly. If you feel it, give the flat side of the blade one or two light strokes against the rod, nearly flat, just to knock it off.
Most people skip this step because they don’t know what a burr feels like. It’s subtle. If the edge feels slightly rough or catches your skin in one direction but not the other, that’s it. Removing the burr is what separates a blade that cuts well from one that just feels sharp but still snags. You’ll notice the difference immediately in your first test cut.
- Use your thumb pad, not your fingertip, to check for burrs
- One or two flat strokes on the rod removes it cleanly
- Always check both blades before testing
Test Cut Method
Don’t test on paper first. Use a thin piece of fabric or a paper towel folded twice. Paper is forgiving. Fabric shows you exactly where the edge is still rough or dragging. Hold the material loosely, don’t stretch it tight, and make a slow cut from base to tip. If the scissors pull the fabric instead of slicing it, you’ve got a burr left or the angle was off. If it cuts clean and quiet, you’re done.
A properly sharpened blade makes almost no sound cutting fabric. There’s a soft whisper, nothing else. When you hear that sound, you’ll know the edge is where it needs to be. If you hear any catching or tearing, open the scissors, check your pivot screw tightness, and repeat the stroke sequence with a slightly adjusted angle. Small adjustments matter more than more strokes.
- Test on fabric, not paper
- A clean cut is quiet, not noisy
- If fabric pulls, check for burrs before adding more strokes
Rod Type Differences
Not every rod works the same. A ceramic rod is more aggressive than a regular steel honing rod. If you use a ceramic rod on delicate fabric scissors, you risk removing too much material too fast. A standard steel honing rod is more forgiving for everyday scissors and gives you better control. Diamond rods work fast but require fewer strokes and more precision on the angle.
If you’re not sure what type of rod you have, run your fingernail lightly along the surface. A ceramic rod feels rough, almost like fine sandpaper. A steel rod feels smooth with a slight texture. A diamond rod feels gritty and hard. Match your rod choice to your scissors. Kitchen shears can handle a ceramic rod. Fine embroidery scissors need the gentlest steel rod you own.
- Ceramic rods remove more metal per stroke
- Steel rods are safer for fine or delicate scissors
- Diamond rods require fewer strokes and precise angle control
Once you’ve done this a few times, you’ll develop a feel for it. Your hands will know the right angle before your brain figures it out, and you’ll get faster without losing accuracy.
Do Cheap Scissors Even Respond to Rod Sharpening?
This is a fair question. Not all scissors are made the same, and some won’t sharpen no matter what you do to them.
Blade Steel Quality
Cheap scissors are often made from low-carbon steel that can’t hold an edge for long. You can sharpen them with a rod, and they’ll cut better right after. But within a few uses, they’ll feel dull again. This isn’t your fault. The steel is too soft to maintain a clean bevel. If you notice your scissors dulling within days of sharpening, the steel is the issue, not your technique. You can keep sharpening them, but they’ll always need it sooner than quality scissors would.
Stamped vs. Forged Blades
Most budget scissors are stamped, meaning the blade is punched out of a flat sheet of steel in one press. Forged blades are shaped under heat and pressure and then ground to an edge. A stamped blade has a thinner, less consistent bevel that wears unevenly. When you sharpen a stamped blade with a rod, you’re working with less material and less precision in the original grind. It works, but don’t expect the same results you’d get from a quality forged pair.
Handle Stress Cracks
Cheap scissors often develop small cracks inside the handle loops from repeated pressure. This has nothing to do with sharpening, but it affects how the scissors feel in your hand. If your hand aches after cutting, check the handles before blaming the edge. A cracked or warped handle changes how you grip, which changes your cutting angle, which makes even sharp scissors feel wrong. You might be fixing the wrong problem.
When to Replace, Not Sharpen
Some scissors are just done. Deep nicks along the cutting edge that you can see with your eye won’t come out with a rod. A rod hones and refines an edge. It can’t remove metal the way a whetstone or a grinder can. If you run your finger along the edge and feel obvious notches or chips, you need either a full re-grind or a new pair. A rod won’t touch those.
- Chips and notches need a whetstone, not a rod
- Replace scissors that have bent blades or cracked pivots
- A rod is a maintenance tool, not a repair tool
Can You Sharpen All Types of Scissors With a Rod?
Not every pair of scissors should go near a honing rod. Knowing the difference saves you from ruining expensive tools.
Kitchen Shear Blades
Kitchen shears are the most rod-friendly scissors you own. They’re built for regular maintenance, and a steel or ceramic rod works perfectly on both blades. Most kitchen shears also come apart at the pivot, which makes sharpening each blade separately much easier. If yours come apart, take them apart before you start. You’ll get a better angle and more consistent strokes when you’re working one blade at a time without the other blade in the way.
Fabric and Dressmaking Shears
These need careful treatment. Fabric shears have a beveled edge on only one side of each blade, which means the flat side should stay flat. If you sharpen the flat side with a rod, you’ll ruin the geometry and the scissors won’t close cleanly anymore. Stick to sharpening only the beveled face, and use very light pressure. A few strokes goes a long way with fabric shears. Over-sharpening removes material you can never put back.
Haircutting Scissors
These are off-limits for rod sharpening. Full stop. Haircutting scissors are precision-ground at very tight tolerances, and a honing rod will almost certainly alter the angle enough to ruin the cut quality. If your haircutting scissors go dull, they need a professional sharpener who uses a wet stone and a loupe to check the bevel. Don’t try this at home with a rod. You’ll spend more replacing them than you would have on a professional sharpening service.
Serrated Scissors
A rod won’t help serrated scissors much. The serrations need individual attention that a flat rod can’t provide. Running a rod along a serrated blade barely contacts the cutting teeth and does almost nothing for the actual edge. If you have a tapered rod, you can sometimes work each gullet individually, but it’s slow and tedious. Most serrated scissors are better off being replaced when they go dull, because the sharpening process is more trouble than it’s worth for everyday use.
- Kitchen shears: best candidates for rod sharpening
- Fabric shears: bevel side only, very light strokes
- Haircutting scissors: professional sharpening only
- Serrated scissors: a rod won’t help much
- Children’s safety scissors: no blade to sharpen, replace them
- Paper crafting scissors: rod works well, same as kitchen shears
Quick Reference Guide for Sharpening Scissors With a Honing Rod
| Factor | Detail |
|---|---|
| Blade angle | 20 degrees |
| Stroke direction | Base to tip |
| Strokes per blade | 8 to 10 |
| Rod type for kitchen shears | Ceramic or steel |
| Rod type for fabric shears | Steel only |
| Burr removal | Flat stroke on rod |
| Test material | Fabric or folded paper towel |
| Pivot check | Before sharpening |
| How often to sharpen | Every 2 to 3 months with regular use |
| When not to use a rod | Serrated or haircutting scissors |
Frequently Asked Questions
How Do You Know When Scissors Need Sharpening?
Your scissors are telling you. If they pull fabric instead of cutting it, leave ragged edges on paper, or feel like they’re chewing rather than slicing, the edge is gone. You can also do a quick test: try cutting a single layer of tissue paper. Sharp scissors slice it cleanly. Dull ones crumple it before the blades even close fully.
Can You Sharpen Scissors With Any Honing Rod?
You can use most rods, but the results vary. A steel honing rod is the safest choice because it removes the least metal per stroke and gives you more control. Ceramic and diamond rods are more aggressive and work faster, but you have to be precise with your angle. If you’re new to this, stick with a steel rod until you get comfortable with the motion.
Should You Oil Your Scissors After Sharpening?
Yes, a tiny drop of food-safe oil or machine oil on the pivot point helps. After sharpening, small metal particles collect around the hinge, and a drop of oil flushes those out and keeps the pivot moving smoothly. Wipe off any excess. You don’t need much, just enough to let the blades open and close without resistance. This step also prevents rust around the pivot.
Is It Safe to Sharpen Scissors at Home Without a Clamp?
Completely safe if you keep your fingers away from the blade path. Hold the rod tip-down on a folded cloth. Bring the blade to the rod, not the other way around. Your non-cutting hand stays on the rod handle only. Never run your fingers along the blade while sharpening to check your progress. Wait until you’re done with your strokes, then check with your thumb pad on the flat side.
Does a Honing Rod Actually Remove Metal From Scissors?
A little, yes. A honing rod is not a grinder, so it removes far less metal than a whetstone. But it does realign and refine the edge by removing the microscopic bent metal that causes dull, draggy cuts. Over years of regular use, your scissors will slowly get shorter at the tip as metal is gradually removed. This is normal and expected.
How Often Should You Sharpen Your Kitchen Scissors?
For regular home use, every 2 to 3 months is a reasonable schedule. If you use your kitchen shears daily on tougher materials like chicken bones or thick herbs, sharpen them monthly. If you only use them occasionally, once or twice a year is fine. You’ll know it’s time when your cutting starts to feel effortful, even on soft materials.
Will Sharpening Ruin the Coating on Coated Scissors?
It can. Some scissors have a non-stick or titanium coating on the blade to prevent material from sticking. Running a honing rod along a coated blade can scratch or remove that coating at the cutting edge. If your scissors have a visible coating, check the manufacturer’s care instructions first. Many coated scissors are meant to be replaced rather than sharpened.
Are Both Blades on Scissors Equally Sharp?
Not always. One blade often dulls faster depending on how you cut. If you cut with a pulling motion, the upper blade takes more stress. If you cut straight down, both blades wear evenly. Check both blades every time you sharpen, and adjust your stroke count if one blade clearly needs more work. Matching the two edges is what gives you a clean, effortless cut.
Final Thoughts
I hope this gives you the confidence to do it yourself. Your kitchen drawer is full of tools that can help you, if you know how to use them. Take care of your scissors, and they’ll take care of you. It takes five minutes, and the difference in your next cut will tell you everything.
