
As an Amazon Associate, I earn from qualifying purchases at no extra cost to you.
How to Use a Julienne Peeler Like a Total Pro at Home
I never thought a tiny little tool could change how I prep vegetables forever. But honestly? It did. So many people spend way too long cutting thin strips by hand, and it’s just exhausting. In this article, you’ll learn exactly how to use a julienne peeler the right way, from start to finish.
Start by picking a firm vegetable like a carrot or zucchini, then wash and dry it well before you begin. Hold the julienne peeler at a slight angle, press it gently against the vegetable, and pull it down in one smooth stroke. Keep your strokes steady and even, rotate the vegetable as you go, and stop before you hit the soft, seedy center.
What is a Julienne Peeler and How Does It Work?
A julienne peeler is a small kitchen tool that looks almost like a regular vegetable peeler. But instead of one flat blade, it has a row of tiny teeth. Those teeth cut your vegetables into long, thin matchstick strips in just one pass. Pretty cool, right?
It works by digging slightly deeper than a normal peeler. As you drag it along the surface of a vegetable, the teeth grab the flesh and slice it into neat little ribbons. No fancy knife skills needed at all.
This tool is super popular in Asian cooking, French cuisine, and healthy meal prep. Think carrot salads, zucchini noodles, garnishes, and stir-fries. Basically anywhere you want those pretty, thin strips without spending ten minutes with a knife.
The best part is that it fits right in your hand, just like a regular peeler. So even if you’re a total beginner in the kitchen, you can pick this up and use it in about two minutes flat.
- A julienne peeler has small teeth that cut vegetables into thin matchstick strips
- It works on firm vegetables like carrots, zucchini, cucumbers, and beets
- It’s faster and safer than hand-cutting julienne strips with a knife
- Most julienne peelers are lightweight, affordable, and easy to clean
- You drag it down the vegetable just like a regular peeler, but the result is way more fun
- It’s perfect for salads, garnishes, stir-fries, and healthy low-carb noodle dishes
How to Use a Julienne Peeler Step by Step for Perfect Strips Every Time
Step 1: Choose the Right Vegetable
Not every vegetable works well with a julienne peeler. You want something firm and solid. Carrots, zucchini, cucumbers, and daikon radish are your best friends here. Soft vegetables like tomatoes or mushrooms will just fall apart, so skip those for now.
When you’re at the store, pick vegetables that feel hard when you squeeze them. A slightly soft zucchini, for example, will get mushy when you try to peel it. So freshness really does matter here.
Also, try to pick vegetables that are straight and even in shape. A weirdly curved carrot is harder to grip and peel safely. A nice, straight one glides through the process much more smoothly.
- Choose firm vegetables like carrots, zucchini, cucumbers, or beets
- Avoid soft or overripe vegetables, as they won’t hold their shape
- Straight vegetables are easier and safer to work with
- Fresh vegetables give you cleaner, prettier strips every single time
Step 2: Wash and Prep Your Vegetable
Before you even touch your julienne peeler, give your vegetable a good rinse under cold water. Scrub it lightly if it has any dirt on the skin. This step only takes a few seconds, but it really matters for cleanliness.
Next, dry it off with a paper towel or clean cloth. A wet vegetable can slip in your hand while you’re peeling, and that’s when accidents happen. So just take a moment and dry it properly.
Then, cut off both ends of the vegetable. This gives you a flat, stable base to work with. Some people also peel the skin off first with a regular peeler, but that’s totally optional depending on what you’re making.
- Always wash your vegetable under cold running water before starting
- Dry it well so it doesn’t slip while you’re holding it
- Cut both ends off to create a flat, stable surface
- Peeling the skin first is optional but can give you cleaner strips
Step 3: Hold It the Right Way
Grip matters more than you think. Hold the vegetable firmly in your non-dominant hand, and hold the julienne peeler in your dominant hand. Your grip should feel steady but relaxed, not tense.
Place the peeler at the top of the vegetable at a slight downward angle. Don’t press super hard yet. Just let the teeth rest gently on the surface before your first stroke. Getting this starting position right makes everything easier.
Keep your fingers curled slightly inward, away from the blade. This is just a basic safety habit, but it’s worth mentioning. A good grip protects your fingers and gives you much better control over each stroke.
- Hold the vegetable firmly in your non-dominant hand
- Keep your fingers curled inward, away from the peeler’s teeth
- Place the peeler at the top of the vegetable at a slight angle
- A relaxed but steady grip gives you the most control and the best results
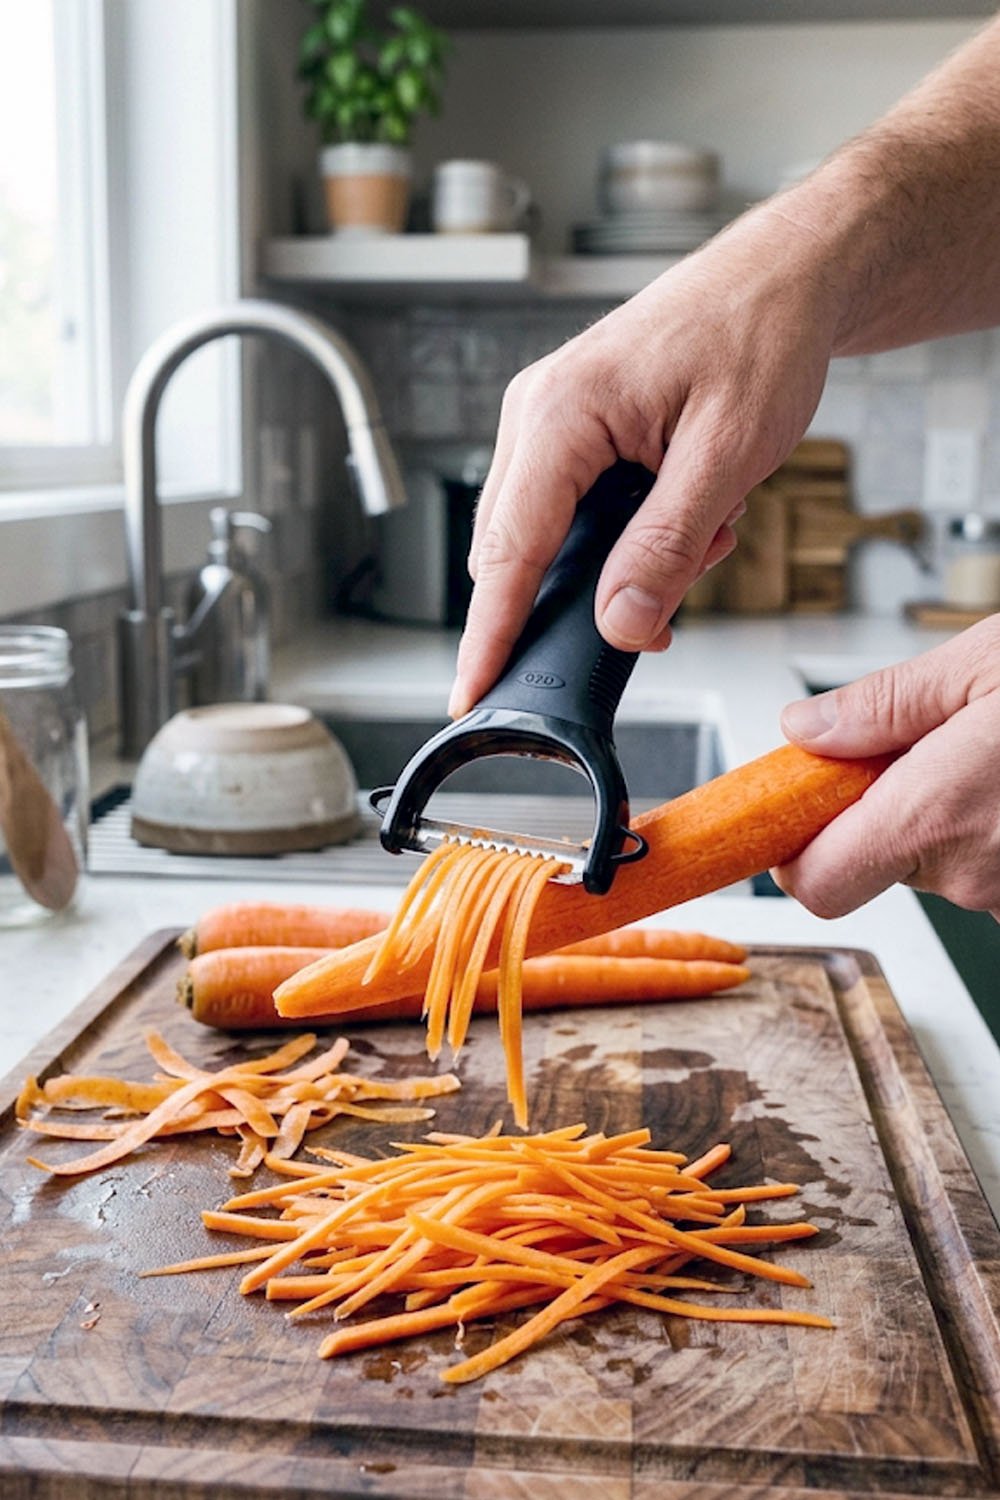
Step 4: Make Your First Stroke
Now comes the fun part. Press the peeler gently against the vegetable and pull it downward in one smooth, even stroke. Don’t rush it. Just let the teeth do the work for you.
You’ll see those beautiful little strips come off right away. That first stroke is honestly so satisfying. If your strips are breaking apart or coming out uneven, you might be pressing too hard or moving too fast. Slow it down a little.
Try to keep each stroke the same length and pressure. Consistency is what gives you those neat, uniform strips that look great on a plate. After a few tries, it starts to feel totally natural.
- Pull the peeler downward in one smooth, steady stroke
- Don’t press too hard, as the teeth do most of the work
- Slow, even strokes give you the most consistent strips
- If strips are uneven, lighten your pressure and slow your pace
Step 5: Rotate as You Go
After a few strokes on one side, rotate the vegetable slightly and start peeling the next section. This keeps your strips even and stops you from hitting the soft, watery center too quickly.
Think of it like sharpening a pencil. You turn it as you go, working around the outside rather than digging straight through. The same idea applies here. Work around the vegetable in sections.
Once you can see the soft core starting to appear, stop peeling that vegetable. The center part doesn’t julienne well and can make your strips mushy. Save the core for soups or stocks if you don’t want to waste it.
- Rotate the vegetable slightly after every few strokes
- Work around the outside in sections, just like sharpening a pencil
- Stop peeling when you start to see the soft, watery center
- Save the leftover core for soups, broths, or smoothies
Step 6: Clean and Store Your Peeler Properly
After you’re done, rinse the julienne peeler under warm running water right away. Don’t let vegetable bits dry on the teeth, because they get really hard to remove later. A quick rinse takes five seconds and saves you a headache.
Use a small brush or an old toothbrush to gently scrub between the teeth. This gets out any tiny pieces stuck in the gaps. Most julienne peelers are also dishwasher safe, but double check your specific one first.
Once it’s clean, dry it fully before putting it away. Storing a wet peeler can cause rust over time, especially if it has metal parts. A dry, cool drawer is the perfect home for it.
- Rinse the peeler under warm water immediately after use
- Use a small brush to clean between the teeth gently
- Most julienne peelers are dishwasher safe, but check the label first
- Always dry it completely before storing to prevent rust
What Vegetables Work Best With a Julienne Peeler?
This is a question a lot of beginners ask, and it’s a great one. The short answer is, stick to firm vegetables. Carrots are honestly the most popular choice because they’re firm, straight, and easy to grip. Zucchini is a close second, especially if you’re making low-carb noodles at home.
Cucumbers work really well too, but peel the skin first if you want a softer texture. Daikon radish is fantastic for Asian-style salads and pickles. Beets give you gorgeous purple strips that look amazing on any plate, though they will stain your hands a little.
Butternut squash and firm apples also work surprisingly well. Yes, apples! Julienned apples taste incredible in coleslaw or a fresh salad. Just peel them first and work quickly so they don’t brown.
As a general rule, if you can snap it cleanly in half with your hands, it’ll probably work great with a julienne peeler. Soft stuff is a no-go. So save your ripe avocados and bananas for something else.
- Carrots are the easiest and most beginner-friendly vegetable to start with
- Zucchini makes great low-carb noodles with a julienne peeler
- Cucumbers, beets, and daikon radish all work beautifully
- Firm apples are a surprising but tasty option for slaws and salads
- Butternut squash works well when it’s raw and very firm
- Avoid soft, overripe, or watery vegetables as they won’t hold their shape
Final Thoughts
I hope this gave you the confidence to finally pick up that little tool and actually use it. Learning how to use a julienne peeler takes maybe five minutes, but the results look like you spent an hour in the kitchen. Start with a carrot, take it slow, and enjoy those satisfying strips. You’ve totally got this, and your salads are about to look so much better.
| Feature | Details | Best For | Tip | Common Mistake | Fix |
|---|---|---|---|---|---|
| Blade Type | Serrated teeth in a row | All firm vegetables | Keep teeth clean and sharp | Pressing too hard | Use light, steady pressure |
| Best Vegetables | Carrot, zucchini, cucumber, daikon, beet | Salads, stir-fries, garnishes | Pick straight, firm ones | Using soft or overripe vegetables | Always choose fresh and firm produce |
| Grip Style | Non-dominant hand holds vegetable | All peeling tasks | Curl fingers away from blade | Holding the vegetable too loosely | Grip firmly but not tensely |
| Stroke Direction | Top to bottom, smooth and steady | Creating even strips | One stroke per section | Short, choppy strokes | Slow down and go full length |
| Rotation Method | Turn vegetable slightly after a few strokes | Keeping strips uniform | Work around the outside | Peeling straight through to the center | Stop when soft core appears |
| Cleaning Method | Warm water rinse, small brush for teeth | After every single use | Clean immediately after use | Letting bits dry in the teeth | Rinse right away, use a brush |
| Storage | Dry completely, store in a cool drawer | Long-term care | Never store wet | Storing while still damp | Dry fully with a cloth before putting away |
| Safety | Always curl fingers inward | Every peeling session | Stay focused while peeling | Rushing through strokes | Slow, controlled strokes only |
| Vegetable Prep | Wash, dry, and trim both ends | Before every use | Dry well to prevent slipping | Skipping the drying step | Pat dry with a paper towel |
| Strip Thickness | Thin matchstick strips | Salads, noodles, garnishes | Keep strokes even for consistency | Uneven pressure causing thick strips | Practice on a carrot first |
Frequently Asked Questions (FAQs)
Is it Hard to Use a Julienne Peeler for the First Time?
Not at all. It feels just like using a regular peeler. Start with a carrot, go slow, and you’ll get the hang of it in just a couple of minutes.
Is it Safe to Use a Julienne Peeler on My Fingers?
It can nick you if you’re not careful. Always curl your fingers inward and away from the blade. Take your time and never rush the strokes.
Can I Use a Julienne Peeler on Soft Vegetables?
It’s not a good idea. Soft vegetables like tomatoes or ripe avocados will just mash up. Stick to firm vegetables for the best results every time.
Can I Make Zucchini Noodles With a Julienne Peeler?
Yes, absolutely. It’s one of the most popular uses for this tool. Just peel along the outside of the zucchini and stop before you hit the seedy center.
Do I Need to Peel the Skin Before Using a Julienne Peeler?
It depends on the vegetable. For carrots, you can leave the skin on. For cucumbers or beets, peeling the skin first usually gives you cleaner, nicer strips.
Can I Put My Julienne Peeler in the Dishwasher?
Most of them are dishwasher safe, but always check the packaging first. Either way, rinsing it right after use is the easiest and quickest option.
Do I Need Any Special Skills to Use a Julienne Peeler?
Nope. No knife skills needed at all. If you’ve ever used a basic vegetable peeler, you already know 90% of what you need to use a julienne peeler.
Is it Worth Buying a Julienne Peeler if I Already Have a Knife?
Honestly, yes. It’s faster, safer for beginners, and way easier than cutting thin strips by hand. Plus, it costs almost nothing and takes up barely any drawer space.
