
As an Amazon Associate, I earn from qualifying purchases at no extra cost to you.
How to Use a Mandoline Slicer Safely and Get Perfect Slices
I sliced off a chunk of my fingertip the first time I used a mandoline. Nobody warned me. That’s exactly why I’m writing this. If you’ve been scared to touch yours, or you keep getting uneven slices, I’ve got you. This guide on how to use a mandoline slicer will change that completely.
First, always attach the hand guard before you slice anything. Then, set your thickness dial to the right level for your food. Next, hold your food firmly and push it down the blade in one smooth, steady motion. After that, keep your fingers curled away from the blade at all times. Finally, clean it carefully with a brush, never your bare hands.
What is a Mandoline Slicer and Why Do People Use It?
A mandoline slicer is a flat kitchen tool with a super sharp blade built right into it. You slide food across the surface, and it cuts thin, even slices in seconds. It sounds simple, and honestly, it is. But you need to know what you’re doing first.
Most people buy one because knives just don’t cut it. Getting paper-thin cucumber slices or perfectly even potato chips by hand is nearly impossible. A mandoline does that job in about 30 seconds flat. That’s the whole point.
The thing is, a lot of people pull it out of the box, skip the instructions, and end up bleeding. That’s not the mandoline’s fault. It’s just a tool. A really sharp one. And sharp tools need a little respect.
Once you learn the basics, though, this thing becomes your best friend in the kitchen. Salads look gorgeous. Gratins cook evenly. Everything just looks more put-together. And it saves so much time.
- It gives you perfectly even slices every single time
- It cuts much faster than any knife
- It works on vegetables, fruits, and even cheese
- Most models let you adjust the thickness easily
- It makes fancy dishes look truly professional
- It saves a lot of prep time on busy weeknights
How to Use a Mandoline Slicer the Right Way, Step by Step
This is the part that actually matters. So many people skip steps and then wonder why things go wrong. Let’s slow down and do this properly, one step at a time.
Step 1: Set It Up on a Stable Surface
Before anything else, put your mandoline on a flat, non-slip surface. A lot of models come with little rubber feet, and those feet matter. If your mandoline slides around while you’re slicing, that’s a real problem. So check that it feels solid before you even pick up your food.
Some people place a damp kitchen towel underneath it for extra grip. That’s a smart move, honestly. You want zero movement while you’re working. Also, if your model folds out or has legs to prop it up, set those up now. Get it positioned at a comfortable angle so you’re not straining your wrist.
Always check that the blade looks clean and is locked in correctly. A loose blade is dangerous. Take five seconds to double-check everything before you start. It’s always worth it.
- Place it on a flat, stable counter
- Use rubber feet or a damp towel underneath
- Check that the blade is locked in securely
- Set the angle that feels most comfortable for you
Step 2: Pick the Right Thickness Setting
Every mandoline has a thickness adjustment, and this is where most beginners get confused. Turn the dial or slide the lever until you reach the thickness you need. Thinner settings are great for chips and salads. Thicker ones work better for gratins or roasted vegetables.
If you’re not sure where to start, go with the middle setting first. Slice one piece and check it. Then adjust from there. It only takes a few seconds to change, so don’t stress about getting it perfect on the first try.
Also, think about what you’re making. A cucumber for a salad? Go thin. Potatoes for a gratin? Go a bit thicker so they hold up during cooking. Matching your setting to your recipe actually makes a big difference in the final result.
- Start with a middle setting if you’re unsure
- Thin settings work best for chips and salads
- Thicker settings hold up better during cooking
- Test one slice first before doing the whole batch
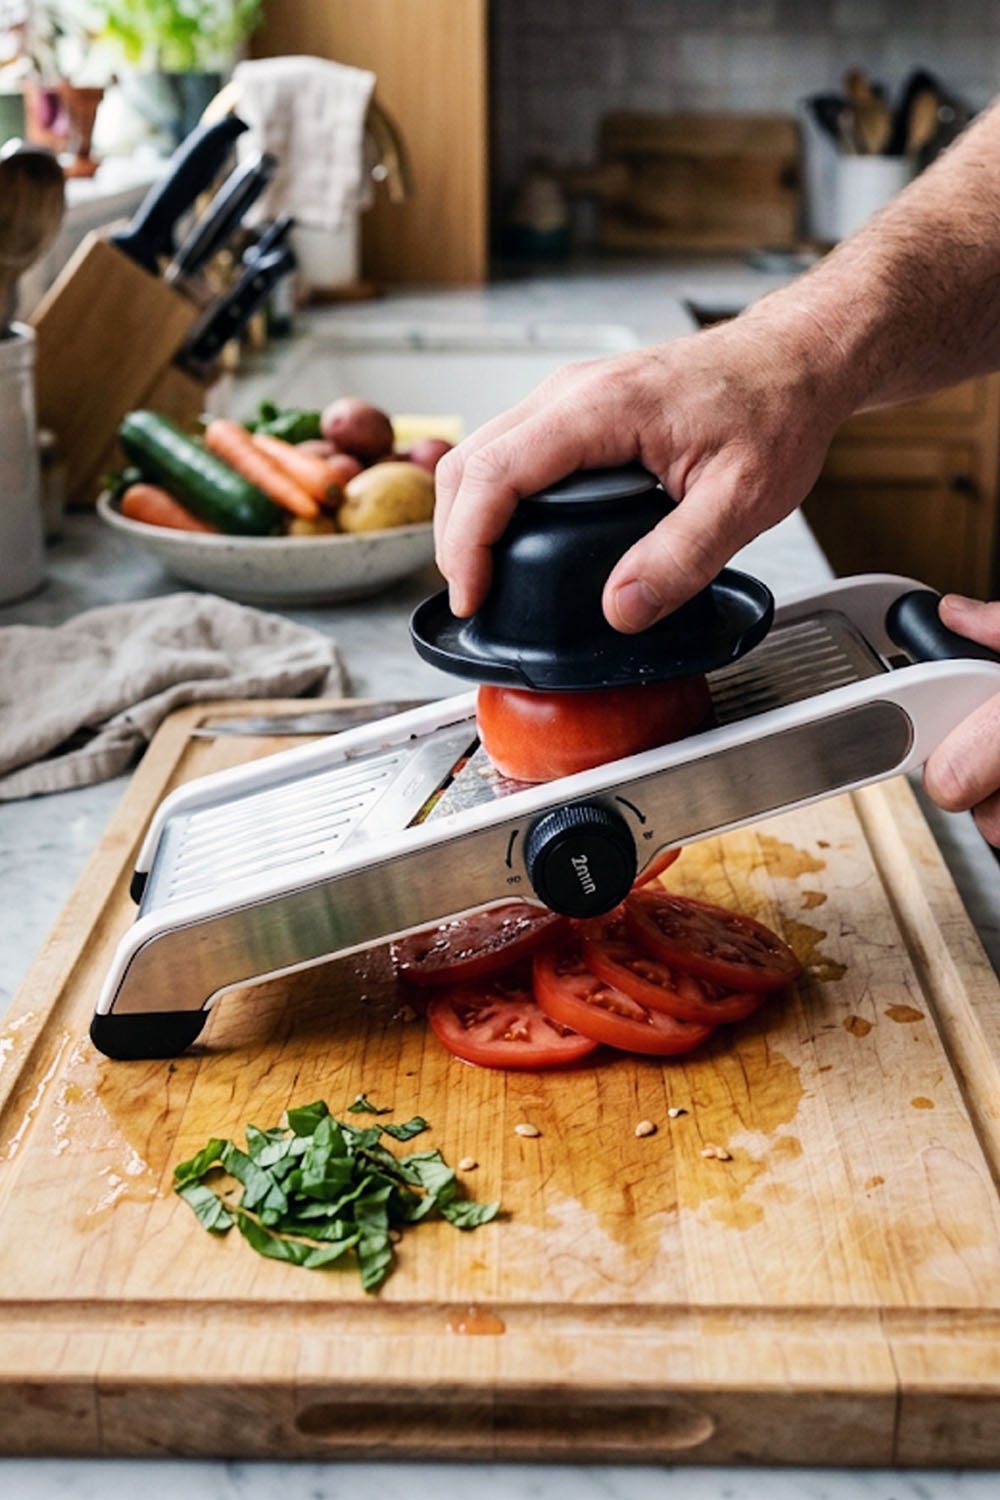
Step 3: Always Use the Hand Guard
This one is non-negotiable. The hand guard is the little plastic piece with spikes or teeth that holds your food. It keeps your fingers away from the blade. Use it every single time, no exceptions.
A lot of experienced cooks skip the hand guard because they feel confident. And then one day, they’re not paying attention for half a second, and it’s bad. Even professionals cut themselves on mandolines. The blade doesn’t care how skilled you are.
Push the spikes firmly into your food before you start slicing. It should feel secure. Then use the guard to guide the food across the blade in a smooth, even motion. Your hand should never get close to the blade itself. The guard is doing that job for you.
- Never slice without the hand guard attached
- Push the spikes firmly into the food first
- Guide the food smoothly across the blade
- Stop slicing when the food gets too small to hold safely
Step 4: Slice with a Smooth, Steady Motion
Now you’re ready to actually slice. Hold the hand guard firmly, press your food down slightly, and push it across the blade in one smooth motion. Don’t rush it. Don’t press super hard. Just let the blade do the work.
Going back and forth in a sawing motion is a common mistake. You don’t need to do that. One smooth pass is all it takes. The blade is sharp enough to cut through most vegetables with very little pressure. Trust it.
Keep your movements even and your speed consistent. If you slow down in the middle of a stroke, you might get a slightly uneven slice. So just stay steady and relaxed. After a little practice, it honestly feels natural.
- Use one smooth motion, not a sawing motion
- Let the blade do the work, don’t force it
- Keep your speed steady throughout each stroke
- Stay focused the whole time you’re slicing
Step 5: Know When to Stop Slicing
This is something nobody really talks about. When your food gets too small to hold safely with the guard, stop. Don’t try to squeeze out those last few slices. It’s not worth it.
At that point, the piece is too small for the hand guard to grip well. Your fingers end up way too close to the blade. So just set that small piece aside and use it for something else, like a soup or a stir fry, where the size doesn’t matter.
A lot of finger injuries happen right here at this step. People get greedy about not wasting food, and they push their luck. But honestly, a small piece of vegetable is not worth a trip to the emergency room. Know your stopping point and stick to it.
- Stop when the food is too small for the hand guard
- Set small leftover pieces aside for other dishes
- Never try to hold tiny pieces with your bare fingers
- Your stopping point should feel safe and comfortable
Step 6: Clean It the Right Way
Cleaning a mandoline is honestly where a lot of accidents happen. People reach into the sink without looking, and they cut themselves on the blade that’s just sitting there. So let’s be smart about this.
First, never put your mandoline in a sink full of soapy water where you can’t see it. Always clean it right away, before it goes anywhere near standing water. Use a stiff brush, not a sponge, to scrub the blade. A sponge can fold over the blade edge and cut right through it.
After washing, dry it carefully with a towel, but keep your fingers away from the blade edge. Some people wear a cut-resistant glove just for cleaning. That’s a genuinely smart idea. Then store it somewhere safe where the blade won’t get bumped or grabbed accidentally.
- Never soak it in a sink full of water
- Use a stiff brush to clean around the blade
- Dry it carefully, keeping fingers away from the edge
- Store it safely where the blade is protected
Can You Use a Mandoline Slicer on All Types of Food?
Mostly yes, but not on everything. Mandoline slicers are built for firm fruits and vegetables. Think cucumbers, zucchini, potatoes, beets, carrots, apples, and fennel. These all slice beautifully because they’re firm and hold their shape under the blade.
Softer foods are trickier. Tomatoes, for example, can be done, but you need a very sharp blade and a very gentle hand. Same with ripe peaches or soft cheese. These foods tend to squish a little instead of slicing cleanly, so the results aren’t always perfect.
Meat is generally not a great idea on a standard mandoline. Some heavy-duty models can handle partially frozen meat for things like shawarma or carpaccio, but a regular home mandoline isn’t really made for that. Stick to produce and firm cheese and you’ll get the best results.
The bottom line is this: if the food feels firm when you press it, a mandoline will probably handle it well. If it feels mushy or slippery, a knife might actually do a better job. Know your tool, and you’ll always get great results.
- Great for firm vegetables like potatoes, beets, and carrots
- Works well on firm fruits like apples and pears
- Use extra care with soft foods like ripe tomatoes
- Avoid very soft or overly ripe produce
- Most home mandolines are not made for raw meat
- Firm cheese like cheddar or parmesan slices very nicely
Final Thoughts
I hope this helped you feel actually ready to use your mandoline without any fear. It really is one of the most useful tools in the kitchen when you treat it with a little respect. So go ahead, set it up, use that hand guard, and start slicing. You’ve got this. Knowing how to use a mandoline slicer properly makes every single meal prep so much easier.
| Food Type | Best Thickness Setting | Suggested Use | Slicing Tip | Safety Note | Result |
|---|---|---|---|---|---|
| Cucumber | 1 to 2 mm | Salads, garnishes | Chill before slicing for cleaner cuts | Always use hand guard | Paper-thin, even rounds |
| Potato | 3 to 4 mm | Gratins, chips, roasting | Slice straight from cold water soak | Watch fingers near end of piece | Uniform, even slices |
| Zucchini | 2 to 3 mm | Stir fry, grilling, salads | Slice lengthwise for ribbon shapes | Keep surface dry for grip | Smooth, flat ribbons |
| Apple | 2 to 3 mm | Desserts, salads, snacking | Core first, then slice whole | Firm grip on hand guard needed | Clean, round slices |
| Beet | 2 to 3 mm | Roasting, salads, pickling | Peel first to avoid slipping | Wear gloves to avoid staining | Beautiful, even rounds |
| Fennel | 1 to 2 mm | Salads, braising, garnish | Trim base flat for stability | Watch for bulky fronds | Delicate, thin shavings |
| Carrot | 2 to 3 mm | Soups, salads, snacking | Trim a flat side first | Use full hand guard always | Neat, consistent coins |
| Firm Cheese | 3 to 4 mm | Charcuterie boards, cooking | Keep cheese cold before slicing | Use brush to clean blade after | Even, pretty slices |
| Radish | 1 to 2 mm | Tacos, salads, garnish | Slice very quickly with light pressure | Small size, stay careful | Crisp, translucent rounds |
| Sweet Potato | 3 to 4 mm | Chips, roasting, casseroles | Peel and dry completely first | Dense food, use steady pressure | Thick, even pieces |
Frequently Asked Questions (FAQs)
Is It Safe for Beginners to Use a Mandoline Slicer?
Yes, absolutely. Just always use the hand guard and take your time. Start slow, focus on each stroke, and you’ll be fine. Most accidents happen when people rush or skip the safety tools.
Can I Slice Onions on a Mandoline Slicer?
Yes, you can. Cut the onion in half first and trim the base flat so it sits steady. Then slide it across the blade carefully. Use the hand guard and expect some tears along the way.
Is It Okay to Put a Mandoline Slicer in the Dishwasher?
Some models are dishwasher-safe, but always check your manual first. Many mandolines do better with a quick hand wash using a stiff brush. The dishwasher can sometimes dull the blade over time.
Can I Use a Mandoline Slicer Without the Hand Guard?
Technically yes, but please don’t. The hand guard is what keeps your fingers away from the blade. Skipping it is how most slicing injuries happen. Always use it, even for just one slice.
Do I Need a Fancy Mandoline to Get Good Results?
Not at all. A simple, basic mandoline with a good sharp blade works great. You don’t need extra features. Just make sure it feels sturdy and has a reliable hand guard.
Is It Hard to Clean a Mandoline Slicer?
It’s not hard at all, but you do need to be careful. Use a stiff brush on the blade, never a sponge. Don’t leave it soaking in water. Rinse and dry it right after use each time.
Can a Mandoline Slicer Replace a Good Kitchen Knife?
Not entirely. A knife is still better for chopping, dicing, and rough cuts. But for thin, even slices in large batches, a mandoline is so much faster and more consistent than any knife.
Do I Really Need to Use Cut-Resistant Gloves?
You don’t have to, but they’re a really smart idea, especially during cleaning. If you’re new to mandolines, a pair of cut-resistant gloves gives you a lot of extra confidence and protection.
