
As an Amazon Associate, I earn from qualifying purchases at no extra cost to you.
How to Use Smith’s Knife Sharpener for Perfectly Sharp Knives
Dull knives are honestly dangerous. Most people think a sharp knife is the risky one, but it’s actually the opposite. A dull blade slips off food and cuts your hand instead. I learned that the hard way once, and I never forgot it.
So many home cooks struggle with this. They have great knives but no idea how to keep them sharp. The good news? Smith’s knife sharpener makes it super easy, even if you’ve never sharpened a knife before. By the end of this post, you’ll know exactly how to use it like a pro.
Start by choosing the right slot on your Smith’s sharpener, coarse for very dull blades and fine for a quick touch-up. Then pull the knife gently toward you with light pressure, repeat 3 to 6 times per slot, rinse the blade after, and always store your knife properly to keep that sharp edge lasting longer.
What is Smith’s Knife Sharpener and How Does It Work?
Smith’s is one of the most trusted names in knife sharpening. They’ve been around for over 160 years, which honestly says a lot. Their sharpeners are built for everyday home cooks, not just professional chefs. So if you’re a beginner, you’re in the right place.
The way it works is pretty simple. Inside the sharpener, there are pre-set sharpening slots with abrasive materials, like carbide or ceramic rods, sometimes even a diamond rod. Each slot is angled perfectly so you don’t have to guess anything. You just pull the knife through.
Most Smith’s sharpeners have two or three slots. The coarse slot grinds away metal to reshape a very dull edge. Then the fine slot smooths everything out. Some models even have a ceramic finishing slot for a polished, razor-sharp result.
What makes it great is the simplicity. No skill needed, no special angle to hold. Just pull, repeat, and you’re done. Even kids learning to cook can do this with a little supervision.
- Smith’s has been making sharpeners for over 160 years
- Pre-set slots take away all the guesswork for beginners
- Carbide slots are for reshaping very dull or damaged blades
- Ceramic slots give a smooth, clean, polished finish
- Diamond slots are the toughest and work on hard steel blades
- Most models are compact, affordable, and beginner-friendly
How to Use Smith’s Knife Sharpener Step by Step
Step 1: Pick the Right Slot for Your Knife
Before you even touch the sharpener, look at your knife first. Is it really dull, like it can’t even cut a tomato? Or is it just a little off and needs a quick fix? That answer tells you which slot to start with.
If your knife is very dull, start with the coarse slot. That’s usually the first slot on the left side of the sharpener. It’s more aggressive and removes more metal to rebuild the edge. Think of it as the heavy-duty setting.
For a knife that’s just slightly dull, skip straight to the fine slot. It’s gentler and just refines the edge without taking off too much metal. Always match the slot to the condition of your blade. Using the wrong slot wastes time and can wear your knife down faster than needed.
- Coarse slot is for very dull or damaged blades
- Fine slot is for light touch-ups and maintenance
- Diamond slot works best on hard, high-carbon steel knives
- Never start with fine if the blade is really dull
- Check your knife’s sharpness before picking a slot
- When in doubt, start coarse and finish fine
Step 2: Set Up the Sharpener on a Stable Surface
This step sounds too easy, but it actually matters a lot. Place your Smith’s sharpener on a flat, stable surface like a countertop or a cutting board. Make sure it won’t slide around while you’re using it.
Most Smith’s sharpeners have a non-slip rubber base at the bottom. That little feature keeps everything steady so the sharpener doesn’t move while you’re pulling the knife through. Still, always hold the sharpener firmly with your non-dominant hand.
Also, keep your fingers away from the sharpening slots. Your fingers should grip the outer sides of the unit, not hover near the opening. Safety first, always. A stable setup means better control and a more even sharpen across the whole blade.
- Always use a flat, non-slip surface for better control
- The rubber base on most Smith’s models prevents sliding
- Hold the sharpener with your non-dominant hand firmly
- Keep fingers on the outer casing, away from the slots
- Good posture and a steady setup gives you more even results
- Never sharpen in the air or on an unstable surface
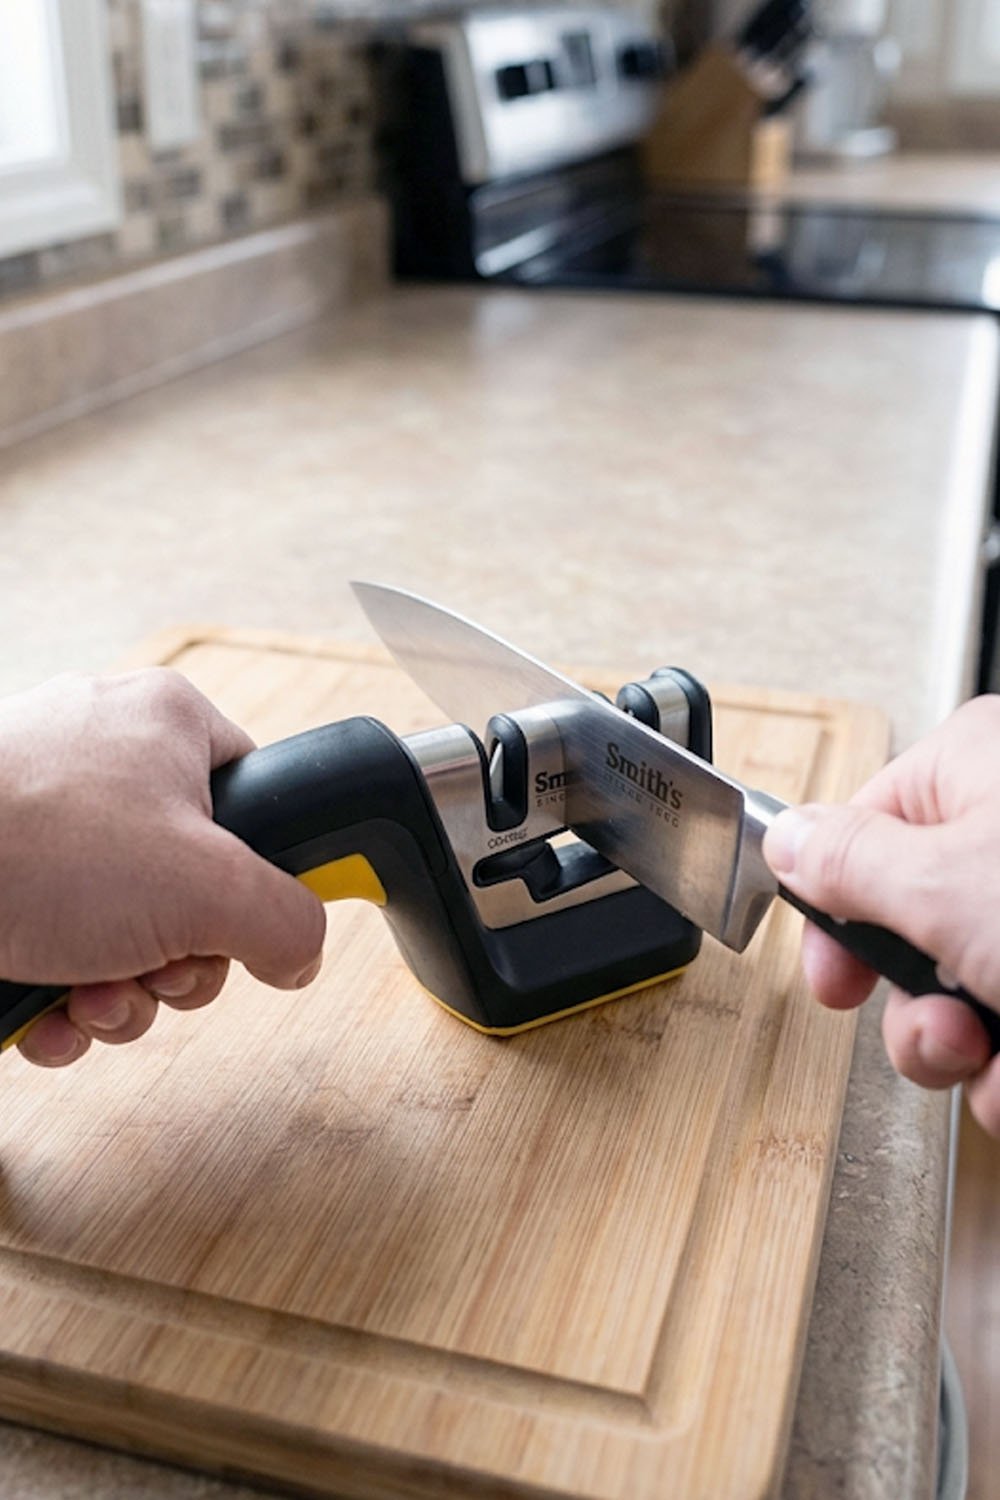
Step 3: Pull the Knife Through With the Right Pressure
Now the fun part. Hold the knife handle with your dominant hand. Place the heel of the blade, that’s the back end near the handle, into the slot first. Then pull the knife slowly toward you, moving from heel to tip in one smooth stroke.
Use light to medium pressure. You don’t need to press hard. The sharpener does the work for you because the slots are pre-angled. Pressing too hard won’t make it sharper faster, it just wears the blade down unevenly. Keep it gentle and steady.
Pull the full length of the blade through in each stroke. From heel all the way to the tip. That way, the whole edge gets sharpened evenly. Short strokes only sharpen part of the blade and leave the rest dull. One full, smooth pull per stroke is all you need.
- Always start at the heel and pull toward the tip
- Use light, consistent pressure for the best results
- Let the pre-set angle do the work, don’t force it
- Pull the full blade length through in every stroke
- Never push the knife forward into the slot
- Keep your pulling motion slow and smooth, not rushed
Step 4: Repeat the Right Number of Times
One stroke is never enough, but you also don’t need to go crazy. For a very dull knife in the coarse slot, do about 5 to 6 pulls. Then move to the fine slot and do 3 to 4 more pulls. That combo gives a solid, sharp edge.
For a knife that just needs a quick refresh, 3 pulls through the fine slot is usually enough. The goal is consistency, not quantity. More pulls don’t always mean sharper results. After a point, you’re just removing metal for no reason.
In between strokes, take a peek at the blade. You’ll actually start to see and feel the difference. The edge looks more defined, and the knife feels more responsive. Trust the process and don’t rush it. A steady routine beats a frantic one every time.
- Dull knives need 5 to 6 pulls in the coarse slot first
- Always finish with 3 to 4 pulls in the fine slot
- A quick refresh only needs 3 pulls through fine
- Don’t over-sharpen, it removes more metal than needed
- Check the blade between strokes to track your progress
- Consistent routine beats random heavy sharpening every time
Step 5: Rinse the Blade After Sharpening
Once you’re done sharpening, rinse the blade under warm water. This washes off any tiny metal shavings left on the edge from the sharpening process. Those tiny bits are called “filings” and you don’t want them on your food.
After rinsing, dry the knife with a clean towel right away. Never leave a wet knife sitting on the counter or tossed in a drawer. Water causes rust, especially on carbon steel blades. A quick dry goes a long way toward keeping your knife in great shape.
Some people also wipe the inside of the sharpener slots with a dry cloth after each use. That’s a great habit. It keeps metal shavings from building up inside the slots and affecting future sharpenings. A clean tool always performs better.
- Always rinse the blade with warm water after sharpening
- Metal filings left on the blade can get into your food
- Dry the knife right away with a clean kitchen towel
- Wet knives rust fast, especially carbon steel ones
- Wipe out the sharpener slots to remove built-up filings
- A clean knife and clean sharpener both last much longer
Step 6: Test the Sharpness and Store It Right
Testing is simple. Grab a piece of paper and try slicing through it. A sharp knife cuts cleanly and smoothly. A still-dull knife tears or snags. That paper test never lies. You can also try slicing a tomato, which is another great real-world test.
If the knife passes the test, great job! Now store it properly so that sharp edge actually lasts. The worst thing you can do is toss it into a drawer with other utensils. Metal banging on metal dulls your blade fast.
Instead, use a magnetic knife strip on your wall, a proper knife block, or blade guards if you store them in a drawer. Good storage is honestly half the battle when it comes to keeping knives sharp between uses.
- Use the paper test to check sharpness after every session
- A clean slice means the knife is sharp and ready to use
- The tomato test is another easy real-world sharpness check
- Never toss sharp knives loosely into a drawer
- A magnetic strip or knife block protects the blade edge
- Blade guards are a great option for drawer storage
Does Using Smith’s Knife Sharpener Damage Your Knives?
This is a question a lot of people ask, and it’s a fair one. The honest answer is no, not when you use it correctly. Every time you sharpen a knife, a tiny bit of metal is removed. That’s just how sharpening works. But done right, it’s completely fine.
The key is not over-sharpening. If you run your knife through the coarse slot 20 times every week, yes, you’ll wear it down faster than needed. But a light touch-up every few weeks keeps the blade healthy without taking off too much metal over time.
Smith’s sharpeners are also designed with home cooks in mind. The pre-set angles are safe for most standard kitchen knives. They’re not too aggressive for everyday use. So as long as you’re not going overboard, your knives will be just fine.
One thing to note though, Smith’s sharpeners are not ideal for Japanese knives with very thin, delicate edges. Those usually need a special whetstone. For standard Western-style kitchen knives, however, Smith’s works really well and won’t cause damage with normal use.
- Normal use does not damage knives in any meaningful way
- Over-sharpening too often removes more metal than needed
- Light touch-ups every few weeks is the healthiest routine
- Pre-set angles are safe for most standard kitchen knives
- Avoid using coarse slots on already-sharp knives unnecessarily
- Japanese knives with thin edges need a whetstone instead
Final Thoughts
I hope this gave you the confidence to finally use that Smith’s sharpener sitting in your kitchen drawer. Sharp knives make cooking easier, safer, and honestly way more fun. Learning how to use Smith’s knife sharpener is one of the best small skills you can pick up. Start with one knife today. You’ll feel the difference right away, and you’ll never go back.
| Feature | Coarse Slot | Fine Slot | Diamond Slot | Ceramic Slot | Storage Tips |
|---|---|---|---|---|---|
| Best For | Very dull or damaged blades | Light touch-ups and maintenance | Hard steel, high-carbon knives | Final polishing and finishing | Keeping sharp edges longer |
| How Abrasive | Very aggressive, removes more metal | Gentle, removes very little metal | Extremely hard, for tough blades | Smooth, refines the edge finely | Not applicable |
| Number of Pulls | 5 to 6 pulls per session | 3 to 4 pulls per session | 4 to 5 pulls depending on dullness | 2 to 3 finishing pulls | Sharpen every 2 to 4 weeks |
| Knife Types | Western-style chef knives, cleavers | All standard kitchen knives | Hard Japanese or hunting knives | All knives for a polished finish | All knife types need proper storage |
| Pressure Needed | Light to medium, steady pull | Light pressure only | Light and consistent strokes | Very light, almost no pressure | No pressure needed for storage |
| After Care | Rinse blade, dry immediately | Rinse and dry after use | Rinse well, dry blade fully | Wipe with a dry cloth after use | Use knife block or magnetic strip |
Frequently Asked Questions (FAQs)
Is it Safe to Use Smith’s Knife Sharpener Every Day?
Using it every day is a bit too much. Every few weeks is the sweet spot. Daily use removes too much metal over time and wears your blade down faster than needed.
Can I Use Smith’s Knife Sharpener on Serrated Knives?
Yes, some Smith’s models have a special serrated slot. Check your specific model first. Not all sharpeners handle serrated edges, so always read the product details before trying it.
Is it Okay to Use the Coarse Slot on a Slightly Dull Knife?
It’s better to skip it and use the fine slot instead. The coarse slot is aggressive. Using it on a mildly dull knife removes more metal than necessary and shortens your knife’s life.
Can Smith’s Knife Sharpener Work on Japanese Knives?
It’s not the best choice for Japanese knives. Those blades have a very thin, delicate edge and usually need a whetstone. Using a standard sharpener on them can damage that fine edge.
Do I Need Any Special Skills to Use Smith’s Sharpener?
Not at all. That’s the whole point. The pre-set slots handle the angle for you. Just pull the blade through smoothly and let the sharpener do the work. No experience needed.
Can I Sharpen a Pocket Knife With Smith’s Sharpener?
Yes, most Smith’s models work great on pocket knives. Just use the fine slot for a quick touch-up. The process is exactly the same as sharpening a kitchen knife.
Is it Normal for Metal Shavings to Appear After Sharpening?
Totally normal. Those tiny metal bits come off during the sharpening process. Always rinse your blade with warm water after each session to wash them off completely before cooking.
Do I Need to Oil the Sharpener Before Using It?
No, Smith’s electric and manual sharpeners don’t need oil. Just keep the slots clean by wiping them out after use. A dry, clean sharpener always performs better and lasts longer.
