
As an Amazon Associate, I earn from qualifying purchases at no extra cost to you.
How to Cook Duck Legs in Air Fryer (Easy & Fast Results)

You’ve got duck legs and an air fryer, and you want them cooked perfectly – crispy skin and tender meat, without a lot of fuss. Forget long oven times or tricky pan-searing. Your air fryer can give you delicious results fast. I will show you exactly how to get there.
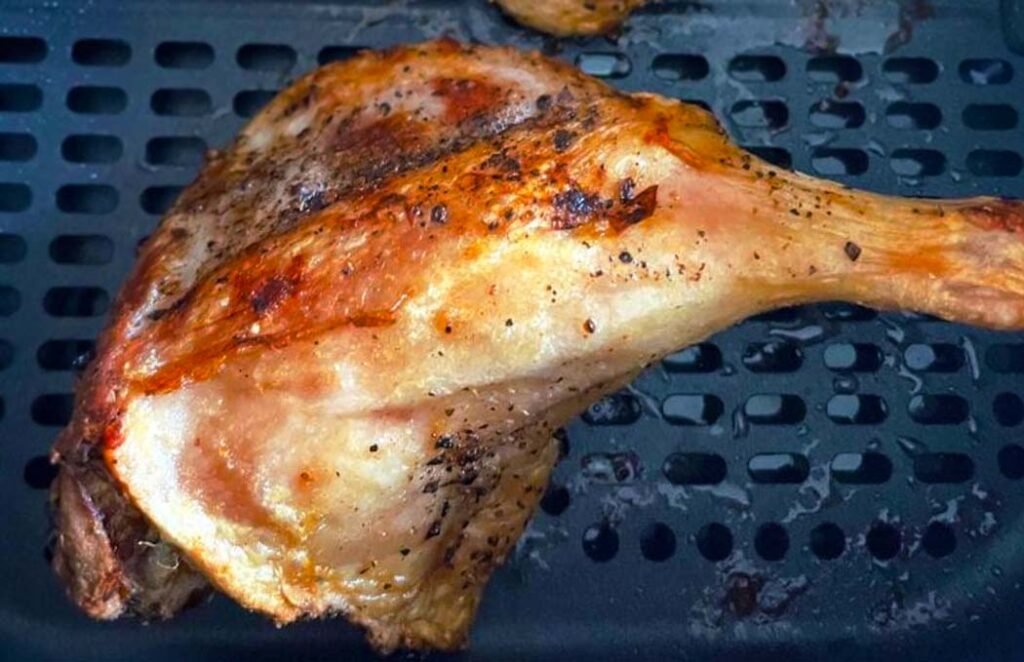
Cook your duck legs at 380°F (190°C) for about 25 to 30 minutes, flipping them halfway through, until the skin is super crispy and the meat is fall-off-the-bone tender. This method ensures you get that perfect crackling you want, right from your air fryer basket. You want to check the internal temperature for your own peace of mind, making sure you are good to go.
Duck Legs: What You Need to Know
Duck legs have a rich flavor and a decent amount of fat, which makes them ideal for cooking methods that can crisp up the skin. Air frying is excellent for this. The hot, circulating air mimics convection but is more intense, meaning you get faster cooking and better crisping than you might expect. Getting the skin right is usually the main goal for duck.
Rich Meat
Duck legs are known for their dark, flavorful meat. It’s richer than chicken and has a slightly gamier taste that many people love. The fat content is also higher, which is key to getting that wonderfully crispy skin.
Your legs will feel fatty, and that’s a good thing here. This fat helps keep the meat moist as it cooks, and it renders out to create a crispy exterior for your enjoyment. You’re looking for tender, succulent meat inside.
To prepare, you can score the skin lightly. This helps the fat render more easily and allows seasonings to penetrate better. You want to see shallow cuts, not deep ones that go into the meat itself.
Fat Rendering
The magic of cooking duck legs, especially in an air fryer, is all about rendering that fat. When the fat melts away from the skin, it leaves behind a deliciously crisp texture. The air fryer’s powerful convection is perfect for this.
This process makes the skin shatteringly crisp, while the meat underneath stays juicy and tender. Without proper rendering, you’re left with chewy, greasy skin, which nobody wants. Your goal is that satisfying crunch.
You should aim to let the duck rest a few minutes after cooking. This allows the juices to redistribute, making your meat even more tender and flavorful. It’s a small step that makes a big difference for your meal.
Crispy Skin Goal
Crispy skin is the hallmark of perfectly cooked duck legs. It’s what sets them apart and makes them feel like a restaurant-quality dish. Your air fryer is your best friend for achieving this. It blast the skin with hot air, making it crackly and delicious.
The high heat in the air fryer helps the fat under the skin to melt and bubble up. This creates that desirable texture you’re after. You’re essentially creating a mini-convection oven experience right in your kitchen.
Make sure your duck legs are dry before you season them. Moisture is the enemy of crispiness. Patting them thoroughly with paper towels will help your skin achieve that perfect, crunchy finish.
Air Fryer Benefits
An air fryer circulates hot air very quickly around your food. This intense heat is fantastic for duck legs, as it crisps the skin much faster than a conventional oven. You get great results in less time.
Because the air fryer is smaller than an oven, it heats up quickly and maintains its temperature efficiently. This means your duck legs are cooking evenly and getting that beautiful crisp without drying out the meat too much. You’ll notice the difference.
You can often fit two duck legs in a standard air fryer basket, maybe three if they aren’t too large. Overcrowding can hinder the crisping process, so keep that in mind for your cooking session.
Seasoning Approach
Simple seasonings work best with duck. Salt and pepper are essential for bringing out the natural flavor of the meat and helping the skin crisp up. Don’t skip this. Your duck legs will thank you for it.
You can add other spices like garlic powder, onion powder, or even a touch of smoked paprika for extra depth. Herbs like thyme or rosemary also pair beautifully with duck. Experiment to find your favorite combination.
Whatever you choose, make sure you season the duck legs generously on all sides, especially under the skin where you can reach. This ensures every bite is packed with flavor for you.
Common Mistakes
One common mistake is not preheating your air fryer. Like an oven, preheating ensures your duck legs hit the right temperature immediately, leading to better fat rendering and crispier skin from the start. Your cooking needs that hot start.
Another mistake is overcrowding the air fryer basket. If you pack too many legs in, the hot air can’t circulate properly. This leads to uneven cooking, leaving you with some parts crispy and others soggy. Space is your friend.
Finally, not checking the internal temperature is a mistake. Duck legs are done when they reach 165°F (74°C), but for really tender meat, many aim for 175-180°F (80-82°C). Trusting the temperature ensures they are cooked safely and deliciously for your meal.
This part explains what duck legs are and why air frying is a good choice for them. You’ve learned about their richness, the importance of fat rendering, and how to get that key crispy skin. Your next steps will focus on actually cooking them.
Cooking Duck Legs in the Air Fryer Step by Step
This guide will walk you through cooking duck legs in your air fryer. You will learn how to prepare them, set the right temperature and time, and achieve that perfect crispy skin and tender meat. Follow these steps carefully for delicious results every time.
Prepare the Legs
Start by patting your duck legs completely dry with paper towels. Moisture is the enemy of crispy skin, so take your time with this step. You want them as dry as possible before seasoning. Your efforts here will pay off.
Next, score the skin. Use a sharp knife to make shallow, crosshatch cuts across the skin of each duck leg. Be careful not to cut into the meat itself. This allows the fat to escape and crisp up beautifully.
Season your duck legs generously on all sides with salt, pepper, and any other spices you like. Make sure some seasoning gets into the scored skin. This is where a lot of the flavor will develop for you.
Set Temperature and Time
Set your air fryer to 380°F (190°C). This temperature is hot enough to render the duck fat effectively and crisp the skin without burning it too quickly. Your appliance should preheat for about 5 minutes.
For most standard-sized duck legs, you’ll need about 25 to 30 minutes of cooking time. This can vary slightly depending on the size of your legs and your specific air fryer model. It's a good starting point for your cooking.
Keep an eye on them, especially towards the end of the cooking time. You want to see the skin turn golden brown and develop those delightful crispy spots. Your aim is a beautiful, crackly finish.
Place in Basket
Arrange the seasoned duck legs in a single layer in your air fryer basket. Make sure there is some space between them. If you are cooking more than two or three legs, you may need to cook them in batches.
Overcrowding the basket will prevent the hot air from circulating properly. This can lead to uneven cooking, soggy skin, and meat that isn’t as tender as it could be. Give your duck legs room to breathe.
Ensure the legs are not touching each other if possible. This allows the air to circulate freely around each leg, ensuring a consistent crisping effect on all sides. Your results will be much better this way.
Cook and Flip
Let the duck legs cook for the initial 25 to 30 minutes. About halfway through the cooking time, usually around the 15-minute mark, you will need to flip them. This ensures even cooking and crisping on both sides.
Use tongs to carefully flip each duck leg. You should see a significant amount of rendered fat in the bottom of the basket; you can drain this off if you like, but be careful, it’s very hot. Your goal is to turn them over gently.
Continue cooking for the remaining time. Watch the skin closely to ensure it's getting nicely browned and crisp. You’re looking for that perfect, appealing texture that signals they are almost ready.
Check for Doneness
The duck legs are done when the internal temperature reaches at least 165°F (74°C). However, for the most tender, fall-off-the-bone results, aim for an internal temperature of 175-180°F (80-82°C). Use a meat thermometer to check.
Insert the thermometer into the thickest part of the leg, avoiding the bone. The juices should run clear. If you see any pinkness or the temperature is too low, continue cooking for a few more minutes, checking frequently.
The skin should be deeply golden brown and visibly crispy. It should feel firm to the touch, with a satisfying crunch when you poke it gently. This is your visual cue that they are perfectly cooked for you.
Rest and Serve
Once cooked, carefully remove the duck legs from the air fryer basket. Place them on a plate or cutting board to rest for about 5 to 10 minutes before serving. This allows the juices to settle back into the meat.
Resting is a crucial step that makes a big difference in the final texture. Skipping this can lead to dry meat, as the juices will run out when you cut into them. Your patience will be rewarded with more tender meat.
Serve your perfectly cooked duck legs immediately. They pair wonderfully with roasted vegetables, mashed potatoes, or a simple side salad. Enjoy the fruits of your labor.
Follow these steps and you’ll have wonderfully crispy duck legs every time. You’ve prepped them correctly, cooked them at the right temperature for the right amount of time, and ensured they are perfectly tender. Enjoy your delicious meal.
Serving Your Air Fryer Duck Legs
Serving your air fryer duck legs is the final step to enjoying this delicious meal. The rich flavor of the duck pairs well with a variety of sides. You want to complement the duck without overpowering its natural taste.
Complementary Sides
Duck legs are quite rich, so lighter, brighter sides work well. Think about a fresh salad with a vinaigrette dressing, or some simple steamed green beans. These offer a nice contrast to the duck’s richness. Your palate will appreciate it.
Mashed potatoes or roasted root vegetables also make excellent partners. They provide a comforting base and absorb the delicious rendered duck fat. You can also add some pan sauce made from the drippings for an extra touch.
Consider what flavors you have used in your seasoning too. If you used herbs like rosemary or thyme, pairing them with roasted potatoes or carrots can enhance those notes. Your meal will feel very cohesive.
Sauces and Glazes
A simple pan sauce made from the drippings in the air fryer basket can elevate your duck legs. Deglaze the pan with a little wine or broth, add some herbs, and reduce it down. It's a quick way to add great flavor.
You could also consider a fruit-based glaze or sauce, like cherry or orange. These sweet and tart flavors cut through the richness of the duck beautifully. They offer a wonderful balance that makes the duck shine.
Just be sure not to add the sauce too early in the cooking process, as it can prevent the skin from getting fully crispy. Applying it near the end or serving it on the side is usually best for your duck.
Flavor Pairings
Duck naturally pairs well with fruits and certain herbs. Think about classic combinations like duck with cherries, apples, or oranges. These sweet and tangy flavors complement the duck’s savory profile perfectly. Your taste buds will agree.
Rosemary, thyme, and sage are also excellent herb choices that enhance duck’s deep flavor. A sprinkle of fresh herbs over the finished legs adds a beautiful aroma and fresh taste. These are simple additions that make a big impact.
Don’t be afraid to experiment with spices too. A touch of star anise or Chinese five-spice powder can give your duck legs an exotic twist. You can tailor the flavors to your personal preference.
Presentation Ideas
For a more elegant presentation, arrange the duck legs on a platter surrounded by your chosen side dishes. Garnish with fresh herbs like parsley or rosemary sprigs for a pop of color. This makes your meal look impressive.
You can also serve them individually plated, perhaps with a swirl of sauce artfully placed on the plate. If you have crispy skin, make sure it’s visible and appealing. Your guests will surely appreciate the effort.
For a more casual meal, just place the legs on a bed of mashed potatoes or rice. The simplicity can be just as appealing. Your main focus is on the delicious duck itself.
Enjoy your perfectly cooked duck legs! They are a fantastic meal that's surprisingly easy to make in the air fryer. You've got a great dish ready to impress.
Adjusting for Your Air Fryer
Different air fryers can vary in power and heat distribution. This means you might need to make slight adjustments to temperature or cooking time to get the best results for your duck legs. Your specific model matters.
Model Differences
Some air fryers run hotter than others, while some may have less efficient fans. If your air fryer tends to run hot, you might need to slightly reduce the temperature or shorten the cooking time to avoid burning the skin. Your duck should still be tender.
Conversely, if your air fryer doesn’t seem to heat up as much, you may need to increase the temperature or add a few extra minutes to the cook time. It’s always good to know how your appliance performs with different foods. You can learn its quirks.
Pay attention to the results you get the first time you cook duck legs. Note down the temperature and time that worked best for your specific machine. This will help you achieve perfect results every time you make them.
Temperature Adjustments
If your duck legs are browning too quickly on the outside but aren’t cooked through, lower the temperature by about 25°F (15°C) and extend the cooking time slightly. This helps the inside cook without scorching the skin. You’re aiming for balance.
If they aren’t crisping up enough, even after the full cooking time, try increasing the temperature by 25°F (15°C) for the last 5-10 minutes. Be sure to watch them closely to prevent burning. This can help achieve that desired crunch.
Always start with the recommended temperature and time. Make adjustments as needed based on your observations and the final result you achieve. Your air fryer’s performance is unique to you.
Cooking Time Variations
The thickness of your duck legs will also affect cooking time. Thicker legs will naturally take longer to cook through than thinner ones. If your legs are particularly large, consider adding an extra 5-10 minutes to the total cooking time.
Conversely, if you are cooking smaller duck legs, you might find they cook faster. Start checking for doneness a bit earlier, perhaps around the 20-minute mark. This prevents overcooking and keeps the meat tender for you.
It’s always better to cook a little longer and check than to undercook. You can always add more time, but you can’t undo overcooked, dry meat. Trust your thermometer for the most accurate measure.
Spacing and Airflow
Ensuring good airflow around the duck legs is critical for crisping. If your air fryer basket is too small, you might only be able to fit one leg comfortably. In that case, cook them one at a time for the best results.
If you can fit two or three legs, arrange them so they aren’t touching. This allows the hot air to circulate evenly around all surfaces of the legs, leading to consistent crisping. Your duck will cook better this way.
Avoid stacking the legs or placing them in a way that obstructs the vents in your air fryer basket. Proper airflow is essential for the success of air fryer cooking. You want that hot air to reach everywhere.
Checking Internal Temp
A reliable meat thermometer is your best friend for cooking duck legs. Don’t guess when they are done; use the thermometer to confirm. You want to see that safe internal temperature for tender meat.
Insert the thermometer into the thickest part of the thigh, away from the bone. Remember that duck is best cooked to a higher internal temperature than chicken for maximum tenderness, so aim for 175-180°F (80-82°C). Your thermometer will tell you.
If you don’t have a thermometer, you can check by piercing the thickest part with a knife; the juices should run clear, not pink. However, a thermometer is the most accurate way to gauge doneness for your peace of mind.
Fat Drainage
As the duck legs cook, a significant amount of fat will render into the bottom of the air fryer basket. This is good for crisping the skin, but too much can make the dish overly greasy. You might want to drain it.
Carefully remove the basket and tilt it to pour out the excess fat into a heat-safe container. Be extremely cautious, as the fat will be very hot. You can save this rendered duck fat for other cooking; it's liquid gold.
Draining the fat periodically during cooking can also help prevent smoke and keep your duck legs from becoming too greasy. Do this midway through or whenever you flip the legs. Your kitchen will stay cleaner too.
Here's a quick summary to help you nail your duck legs: preheat, season well, cook at 380°F for about 25-30 mins, flip halfway, and check temp for tenderness. You’ve got this!
Final Thoughts
I hope you feel confident about cooking duck legs in your air fryer. You’ve got the steps, the temperatures, and the tips to make them perfectly crispy and tender. Remember to keep an eye on your specific appliance, and your delicious duck legs will be a hit.
| Food Item/Preparation | Temperature & Cook Time | Key Tip or Thing to Watch For |
|---|---|---|
| Duck Legs (Air Fryer) | 380°F (190°C) for 25-30 min | Crispy skin, tender meat, 175-180°F internal temp |
| Duck Legs (Scored) | 380°F (190°C) for 25-30 min | Score skin to help fat render |
| Duck Legs (Seasoned) | 380°F (190°C) for 25-30 min | Season generously on all sides |
| Duck Legs (Batched) | 380°F (190°C) for 25-30 min | Avoid overcrowding basket for airflow |
| Duck Legs (Flipped) | 380°F (190°C) for 25-30 min | Flip halfway for even cooking |
| Duck Legs (Tested) | 380°F (190°C) for 25-30 min | Check internal temp (175-180°F) |
| Duck Legs (Resting) | N/A | Rest 5-10 min before serving |
| Duck Legs (Greasy) | 380°F (190°C) for 25-30 min | Drain excess fat periodically |
| Duck Legs (Sauced) | Near end of cook time | Add sauce at the end to keep skin crisp |
Frequently Asked Questions
How Do You Make Duck Legs Crispy in an Air Fryer?
Pat your duck legs very dry, score the skin, season them well, and cook at 380°F (190°C) for about 25-30 minutes, flipping halfway. You want to ensure good airflow and drain excess fat for the crispiest skin.
Can You Cook Frozen Duck Legs in the Air Fryer?
Yes, you can cook frozen duck legs, but you should increase the cooking time significantly, likely by 10-15 minutes. Your duck legs will need to cook longer to thaw and then cook through. You also might not get as crispy skin.
How Long Do Duck Legs Take in the Air Fryer?
Typically, duck legs take about 25 to 30 minutes at 380°F (190°C). You should flip them halfway through cooking. Always check the internal temperature to ensure they are cooked thoroughly for your safety.
What Temperature Should You Cook Duck Legs At?
The best temperature for duck legs in an air fryer is 380°F (190°C). This allows the fat to render properly and the skin to crisp up beautifully. Your duck will be perfectly cooked this way.
Do You Need to Drain the Fat From Duck Legs in the Air Fryer?
It’s highly recommended to drain the rendered fat from the air fryer basket periodically. This prevents the duck from sitting in grease, which can make the skin soggy and lead to smoking. You want your duck to be crisp.
How Do You Keep Duck Legs From Drying Out?
Cook them to the correct internal temperature, aiming for 175-180°F (80-82°C) for tenderness, and let them rest for 5-10 minutes after cooking. Your patience will ensure the meat stays moist and juicy.
Can You Cook Duck Legs in an Air Fryer Without Scoring the Skin?
You can, but scoring the skin is highly recommended. It allows the fat to render out more effectively, leading to much crispier skin. Without scoring, your duck skin might be chewy and less appealing.
Will Duck Legs Fit in My Air Fryer Basket?
Most standard air fryer baskets can fit two duck legs comfortably. If your basket is smaller, you may only be able to fit one at a time, or you might need to cook them in batches. Check your basket size.
