Some of our posts contain affiliate links. If you buy through our links, I may earn a small commission at no extra cost to you.
How to Use a Tart Pan with Removable Bottom: Easy Steps
Are you ready to make delicious tarts at home? Using a tart pan with a removable bottom can make your baking easier. In this blog post, we’ll show you how to use this special pan step by step. You’ll learn how to prepare the crust, fill it with yummy ingredients, and bake it to perfection. Using a tart pan with a removable bottom makes it simple to take out your tart once it’s done. Follow our guide and start creating beautiful and tasty tarts right in your own kitchen!
What You’ll Need
Before you begin, gather these essential items:
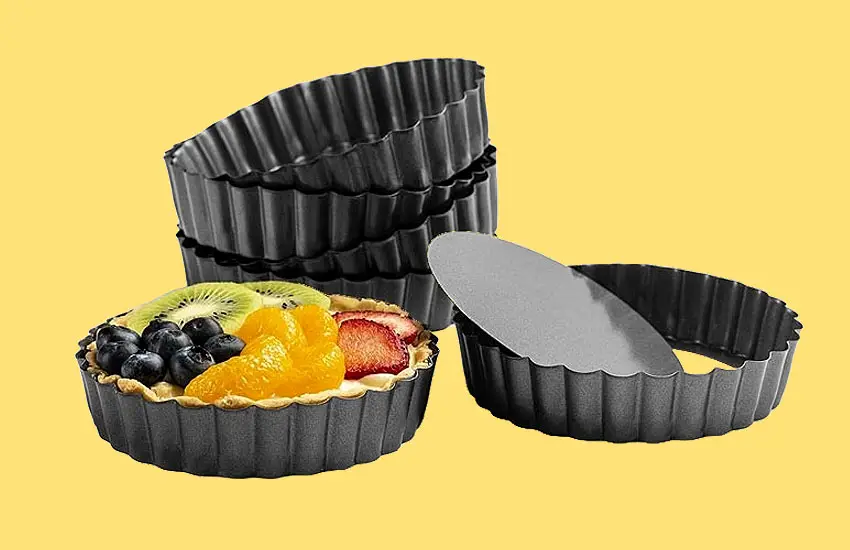
- Tart Pan with Removable Bottom: Choose a good-quality tart pan with sides that can detach from the base.
- Ingredients for Your Tart: Depending on your recipe, this may include pastry dough, fruits, custard, or other fillings.
- Rolling Pin: For rolling out dough.
- Parchment Paper: To line the pan for easy removal.
- Baking Beans or Weights: If your recipe requires blind baking.
- Oven: Preheat according to your recipe’s instructions.
- Cooling Rack: For resting the tart after baking.
Step-by-step Instructions
If you enjoy baking and want to create beautiful, delicious tarts, learning how to use a tart pan with a removable bottom is essential. This guide will take you through everything you need to know, from preparing your pan to baking the perfect tart.
1. Prepare Your Tart Pan
- Wash and Dry: Before use, wash your tart pan and dry it thoroughly.
- Grease or Line: Depending on your recipe, grease the pan with butter or line it with parchment paper to prevent sticking.
2. Roll Out the Dough
Take your prepared tart dough and roll it out on a lightly floured surface. Roll the dough to a size slightly larger than your tart pan. This extra dough will help in lining the sides of the pan properly.
3. Line the Pan
Carefully lift the rolled-out dough and gently place it into the tart pan. Press the dough into the bottom and up the sides of the pan. Trim off any excess dough hanging over the edges using a sharp knife.
4. Prick the Dough
To prevent the crust from puffing up during baking, use a fork to prick the bottom of the tart dough all over. This process is called “docking” and it helps release steam while baking.
5. Add Your Filling
Now it’s time to add your tart filling. Pour or spoon your prepared filling into the tart shell, spreading it evenly over the crust.
6. Bake According to Recipe Instructions
Place the filled tart pan on a baking sheet (to catch any spills) and then into the preheated oven. Bake the tart according to your recipe’s instructions. Keep an eye on it to ensure it doesn’t overbake.
7. Removing the Tart
Once the tart is baked and has cooled slightly, it’s time to remove it from the pan. Place the tart pan on a sturdy, elevated object such as a can or glass. Gently slide the outer ring of the tart pan downwards to release it from the sides of the tart.
Using a tart pan with a removable bottom can make the baking process smoother and help in presenting a beautifully finished tart. With these steps, you can confidently use this type of pan for your next baking adventure. Remember to follow your recipe closely for best results, and enjoy the delicious fruits of your labor!
Tips for Success
Here are the tips for success in using a tart pan with a removable bottom:
Use Quality Ingredients
Always use fresh and good-quality ingredients for the best flavor and texture in your tart. Fresh fruits and high-quality pastry dough can elevate your tart-making experience.
Handle the Dough Gently
When working with pastry dough, be gentle and avoid overworking it. This helps maintain a light and flaky crust. Use a light touch when pressing the dough into the pan.
Experiment with Fillings
Don’t be afraid to get creative with your tart fillings. Try different fruits, nuts, or even chocolate for exciting flavor combinations. Be adventurous and discover what you enjoy the most.
Prevent Soggy Crust
To prevent a soggy crust, ensure that the pastry is properly blind-baked before adding your filling. This step creates a barrier between the filling and the crust, keeping it crisp and delicious.
Follow Baking Instructions
Always follow the baking instructions in your recipe. Pay attention to oven temperatures and baking times to achieve the perfect tart. Every oven is different, so adjust accordingly.
Allow for Cooling Time
After baking, allow your tart to cool in the pan for a few minutes before removing it. This helps the tart set properly and makes it easier to remove from the pan without breaking.
Practice Makes Perfect
Don’t worry if your first tart isn’t flawless. Baking takes practice, so keep experimenting and refining your skills. Each attempt will bring you closer to mastering the art of tart-making.
Enjoy the Process
Baking should be enjoyable and rewarding. Embrace the process of creating something delicious from scratch. Share your tarts with loved ones and savor the fruits of your labor.
By following these simple tips, you’ll enhance your tart-making skills and create delightful treats that everyone will love. So, roll up your sleeves, gather your ingredients, and start baking beautiful tarts with confidence!
Cleaning and Storage
Cleaning and properly storing your tart pan with a removable bottom is essential to maintain its quality and longevity. Here are some easy tips for cleaning and storage:
Cleaning Tips
Hand-Wash Only: Avoid putting your tart pan in the dishwasher, as this can cause damage to the pan’s non-stick coating or finish. Instead, wash the pan by hand using warm, soapy water and a soft sponge or cloth.
Use Non-Abrasive Materials: To prevent scratching the surface of the pan, use non-abrasive cleaning tools. Avoid harsh scrubbing pads or abrasive cleaners that can damage the pan’s finish.
Remove Stubborn Residue: For stubborn food residue, soak the pan in warm, soapy water for a few minutes to loosen the debris before gently scrubbing with a soft brush or sponge.
Dry Thoroughly: After washing, dry the tart pan completely with a soft towel to prevent water spots or rust from forming.
Storage Tips
Store in a Dry Place: Make sure the tart pan is completely dry before storing it. Store it in a dry cabinet or cupboard away from moisture to prevent rust or corrosion.
Protect the Surface: To protect the non-stick coating or finish, consider placing a layer of parchment paper or a soft cloth between stacked pans if you need to stack them for storage.
Avoid Stacking Heavy Items: Try not to stack heavy items on top of the tart pan, as this can cause warping or damage over time.
Consider Hanging Storage: If you have limited space, consider hanging the tart pan on a pot rack or using hooks to keep it accessible and prevent damage from stacking.
By following these cleaning and storage tips, you’ll ensure that your tart pan with a removable bottom stays in excellent condition, ready for your next delicious tart-making adventure. Proper care and maintenance will extend the life of your pan and help you enjoy baking for years to come!
Troubleshooting
Here are troubleshooting tips for common issues when using a tart pan with a removable bottom:
Sticking Issues
If your tart sticks to the pan after baking, gently run a knife around the edge of the tart to loosen it before removing the sides of the pan. You can also line the bottom of the tart pan with parchment paper before adding the crust and filling to facilitate easier removal.
Soggy Crust
To prevent a soggy crust, ensure that you blind-bake the crust adequately before adding the filling. Blind-baking involves baking the crust without the filling to set it and prevent it from becoming soggy when the filling is added. Additionally, consider pre-cooking any wet fillings slightly to reduce their moisture content before adding them to the tart shell.
Crust Cracking or Breaking
Handle the tart with care when removing it from the pan. Allow the tart to cool slightly in the pan before attempting to remove the sides. Use a flat spatula to carefully lift the tart off the removable bottom. Ensure that the crust is fully baked before removing the tart from the pan, as a properly baked crust will hold its shape better.
Uneven Baking
If you notice uneven baking in your oven, rotate the tart halfway through the baking time to ensure even heat distribution. It’s also helpful to check your oven temperature with an oven thermometer to ensure it is accurate and adjust the temperature as needed based on the thermometer reading.
Filling Overflow
Avoid overfilling the tart shell with the filling. Leave some room at the top to allow for expansion during baking. If the edges of the crust are browning too quickly, cover them with a pie shield or aluminum foil to prevent burning while the filling finishes baking.
By applying these troubleshooting techniques, you’ll be better equipped to address common issues that may arise when using a tart pan with a removable bottom, ensuring successful tart-making experiences.
Pros and Cons of Tart Pans with Removable Bottoms
Pros
- Easy Removal: These pans make it simple to release your tart once it’s done baking. You can detach the bottom or lift it out, ensuring your tart comes out neatly without sticking.
- Neat Presentation: With a removable bottom, your tarts often come out looking cleaner and more professional. This is ideal if you want to impress with your dessert presentation.
- Cooling and Cleaning: After baking, the tart can cool more quickly because you can separate it from the pan easily. Cleaning is also easier since you can clean the pan and bottom separately.
- Versatility: Removable bottoms allow you to use the pan for other types of dishes that benefit from easy removal, like quiches or certain cakes.
Cons
- Risk of Leaks: These pans may sometimes leak if not sealed properly. This can create a mess in your oven or make your tart crust soggy.
- Durability Concerns: The bottom part of the pan, especially the locking mechanism, can wear out over time with frequent use, potentially requiring replacement sooner.
- Initial Cost: Tart pans with removable bottoms tend to be more expensive than regular tart pans due to their design and functionality.
- Assembly Challenges: Some users find it challenging to assemble the pan correctly, particularly ensuring the bottom is properly aligned and sealed to prevent leaks.
Final Thoughts
Using a tart pan with a removable bottom opens up a world of possibilities for creating stunning tarts at home. With the right techniques and a bit of practice, you’ll soon be baking impressive tarts that will delight your family and friends.
Enjoy your tart-making journey!


