
As an Amazon Associate, I earn from qualifying purchases at no extra cost to you.
How Long to Cook Whole Chicken in Air Fryer (The Truth is Here!)
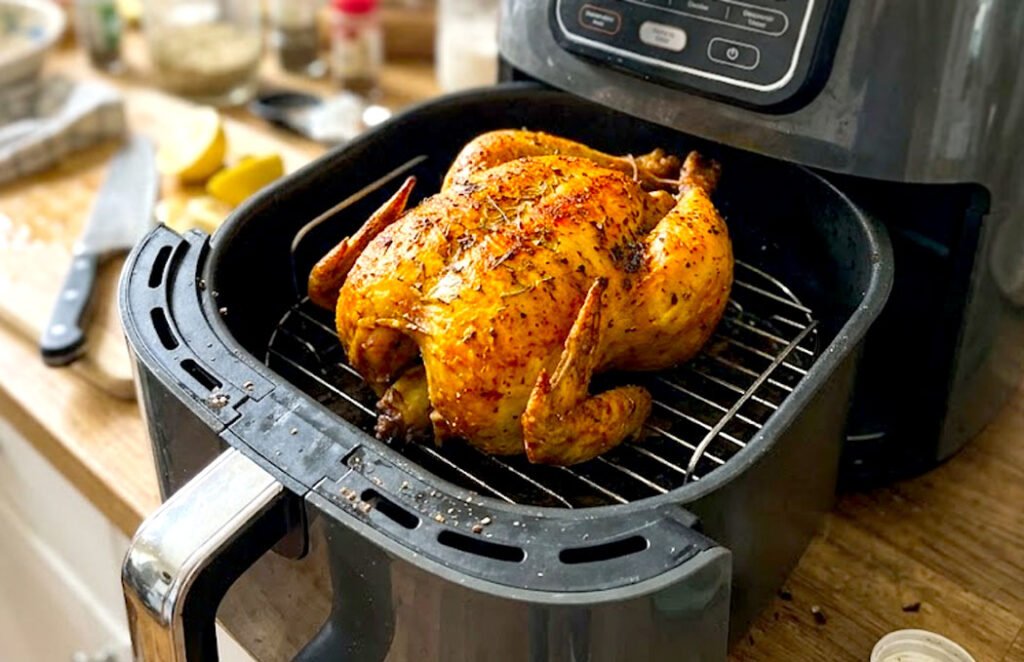
Most people think roasting a whole chicken takes forever. But honestly? The air fryer changed everything. Cooking a whole chicken in the air fryer is faster, crispier, and way less stressful than the oven. The problem is, most folks either undercook it or dry it out completely because they’re guessing on time and temp. So in this post, you’ll learn exactly how long to cook whole chicken in air fryer, the right temperature, and all the little tricks that make it taste like you actually know what you’re doing.
Key Takeaways: Pat the chicken dry before seasoning so the skin gets crispy, not soggy. Season generously under the skin too. Cook at 360°F for the first stretch, then bump it to 400°F at the end for golden color. Always cook breast-side down first, then flip. Use a meat thermometer and check that the thickest part hits 165°F before you call it done.
How Long Does it Take to Cook a Whole Chicken in an Air Fryer?
Here’s the honest answer. A whole chicken in the air fryer takes about 15 to 18 minutes per pound. So a 4-pound chicken will take roughly 60 to 70 minutes total. That’s still faster than a traditional oven, which makes this method a weeknight win.
Now, the size of your chicken really matters here. A 3-pound bird cooks faster than a 5-pound one, obviously. But the key thing most people miss is that different air fryer models heat differently. So your neighbor’s air fryer and yours might give slightly different results even at the same setting.
Temperature also plays a big role. Starting at 360°F keeps the inside cooking gently without burning the outside. Then, for the last 10 minutes or so, crank it up to 400°F. That’s what gives you that gorgeous, crackly golden skin everyone loves.
The most reliable way to know it’s done? A meat thermometer. Stick it in the thickest part of the thigh, away from the bone. Once it reads 165°F, you’re good. Don’t skip this step, because cutting into it and hoping for the best is how you end up with pink chicken nobody wants to eat.
- A 3 lb chicken takes about 45 to 55 minutes
- A 4 lb chicken takes about 60 to 70 minutes
- A 5 lb chicken takes about 75 to 85 minutes
- Always start breast-side down for juicier meat
- Flip the chicken halfway through cooking
- Always confirm doneness with a meat thermometer at 165°F
How to Cook Whole Chicken in Air Fryer the Right Way
Step 1: Pick the Right Size Chicken
This part really matters more than people think. Most home air fryers fit a 3 to 4 pound whole chicken comfortably. Anything bigger and you risk it touching the heating element or not cooking evenly. So before you buy that big bird, measure your air fryer basket first.
A good rule of thumb is leaving at least an inch of space around the chicken. That space lets hot air circulate all around it, and that’s exactly what makes air fryer chicken so much better than oven chicken. Without that airflow, you lose the crunch.
Also, fresh chicken works better than frozen here. If you’re using frozen, make sure it’s completely thawed before cooking. Cooking a partially frozen chicken leads to uneven doneness and that’s just not worth the risk.
- Choose a chicken that fits with room to spare in the basket
- Fresh or fully thawed chicken cooks most evenly
- A 3 to 4 lb bird is the sweet spot for most air fryers
- Avoid birds over 5 lbs unless your air fryer is extra large
Step 2: Dry and Season it Properly
This is the secret most recipes skip over. Pat the chicken completely dry with paper towels before you do anything else. Moisture is the enemy of crispy skin. So get it as dry as you can, inside and out.
Then comes the fun part. Rub butter or oil all over the outside. After that, slide your fingers under the skin and rub seasoning directly onto the meat underneath. That way the flavor actually gets into the chicken, not just on top of it.
For seasoning, garlic powder, paprika, salt, pepper, and a little onion powder is a classic combo that never fails. Feel free to add dried herbs like thyme or rosemary too. Just make sure every inch of that bird is coated well.
- Pat the chicken completely dry before seasoning
- Use butter or olive oil for better browning
- Season under the skin, not just on the surface
- Garlic powder, paprika, salt, and pepper work great together
Step 3: Preheat Your Air Fryer
Yes, preheating matters. A lot of people skip it and then wonder why the chicken didn’t brown right. Preheating your air fryer for about 3 to 5 minutes at 360°F before putting the chicken in makes a real difference.
Think of it this way. Dropping cold chicken into a cold air fryer means the whole thing has to warm up together. But a preheated air fryer hits the chicken with immediate heat, and that’s what starts the browning process right away.
So just set it, let it run for a few minutes, and then place your seasoned chicken in breast-side down. It’s a tiny step that gives you noticeably better results every single time.
- Preheat at 360°F for 3 to 5 minutes before cooking
- A hot air fryer gives the chicken immediate browning
- Breast-side down at the start keeps the white meat juicy
- Don’t skip preheating, even when you’re in a rush
Step 4: Cook It Breast-Side Down First
Most recipes tell you to put the chicken breast-side up from the start. But here’s what actually works better. Flip it upside down first, so the breast faces the bottom of the basket. This lets the juices run down into the breast meat while it cooks.
After about half the cooking time, carefully flip the chicken breast-side up. Use tongs or two sturdy spatulas. Be careful, because the chicken will be hot and a little slippery. This flip is what gives you juicy inside AND crispy skin on top.
For that final stretch, crank the temperature up to 400°F for the last 8 to 10 minutes. That blast of heat at the end is what makes the skin go from just golden to properly crispy and delicious.
- Start with the breast facing down in the basket
- Flip halfway through using tongs or spatulas
- Raise temp to 400°F for the last 8 to 10 minutes
- This method keeps the breast juicy and the skin crispy
Step 5: Check the Temperature Correctly
This step saves you from two disasters: undercooked chicken and dried-out chicken. Both happen when people rely on guessing instead of checking. So grab a meat thermometer and use it every single time.
Insert it into the thickest part of the thigh, making sure it doesn’t touch the bone. Bone conducts heat differently and will give you a false reading. The number you’re looking for is 165°F. That’s the safe zone for poultry.
If it reads 160°F, give it 3 to 5 more minutes and check again. Once it hits 165°F, pull it out immediately. Leaving it in longer just dries it out and there’s no coming back from that.
- Use a meat thermometer, not guessing
- Insert it into the thickest part of the thigh
- Don’t let the thermometer touch the bone
- Pull the chicken out the moment it hits 165°F
Step 6: Rest the Chicken Before Cutting
This one step makes a bigger difference than most people expect. After the chicken comes out of the air fryer, don’t cut into it right away. Let it rest on a cutting board for at least 10 minutes first.
Resting lets the juices redistribute throughout the meat. If you cut too soon, all those juices spill out onto the board and you’re left with drier meat. But if you wait just 10 minutes, those juices stay inside where they belong.
Cover it loosely with foil while it rests. After the rest, carve it however you like and serve it up. You’ll notice the difference immediately. The meat will be noticeably more tender and moist.
- Rest the chicken for at least 10 minutes after cooking
- Cover loosely with foil during resting
- Resting keeps the juices inside the meat
- Don’t skip this, even when you’re hungry and in a hurry
Can You Cook a Frozen Whole Chicken in an Air Fryer?
Technically, yes. But honestly, it’s not ideal. Cooking a frozen whole chicken in the air fryer takes significantly longer and the results are much harder to control. The outside can start browning before the inside even thaws properly.
If you have to do it, start at a lower temperature like 300°F for the first half of cooking. This gives the inside time to thaw and warm up slowly. Then raise the temperature for the second half to finish it properly.
But here’s the thing. The texture and skin quality are just not the same as a properly thawed chicken. The skin tends to steam instead of crisping up, which takes away the whole point of using an air fryer.
So if you have even a few hours, thaw it in cold water first. Put the sealed chicken in a bowl of cold water, change the water every 30 minutes, and it’ll thaw faster than you’d think. That small effort pays off big in the final result.
- Frozen whole chicken is possible but not recommended
- Start at 300°F for the first half if cooking from frozen
- Expect longer cook times and less crispy skin
- Thaw in cold water first for significantly better results
- Change cold water every 30 minutes to speed up thawing
- Always verify 165°F internal temp, especially from frozen
Final Thoughts
So there you have it. Cooking a whole chicken in the air fryer is genuinely one of the easiest things you can do on a busy night. Start with knowing how long to cook whole chicken in air fryer based on its weight, season it well, flip it halfway, and always check that temperature. You’ve totally got this. Give it one try and you’ll never want to go back to the oven again.
| Chicken Weight | Starting Temp | Final Temp | Total Cook Time | Internal Temp Goal | Rest Time |
|---|---|---|---|---|---|
| 3 lbs | 360°F | 400°F (last 10 min) | 45 to 55 min | 165°F | 10 min |
| 3.5 lbs | 360°F | 400°F (last 10 min) | 52 to 60 min | 165°F | 10 min |
| 4 lbs | 360°F | 400°F (last 10 min) | 60 to 70 min | 165°F | 10 min |
| 4.5 lbs | 360°F | 400°F (last 10 min) | 67 to 75 min | 165°F | 10 min |
| 5 lbs | 360°F | 400°F (last 10 min) | 75 to 85 min | 165°F | 10 min |
| 5.5 lbs | 360°F | 400°F (last 10 min) | 82 to 90 min | 165°F | 10 min |
Frequently Asked Questions (FAQs)
Is it Safe to Cook a Whole Chicken in an Air Fryer?
Yes, completely safe. Just make sure the internal temperature reaches 165°F in the thickest part of the thigh. That confirms it’s fully cooked and safe to eat.
Can I Use Olive Oil Instead of Butter on the Chicken?
Absolutely. Olive oil works great and gives a slightly different flavor. Both help the skin brown and crisp up nicely. Either one is a good choice.
Do I Need to Flip the Chicken While Cooking?
Yes, flipping halfway through really helps. It gives you crispier skin on both sides and helps the chicken cook more evenly from top to bottom.
Is it Okay to Cook Vegetables Alongside the Chicken?
It’s tricky with a whole chicken because the basket fills up fast. Small veggies underneath can work, but expect them to get quite soft from the drippings.
Can I Season the Chicken the Night Before?
Yes, and it actually makes the flavor better. Seasoning overnight lets everything soak deeper into the meat. Just cover it and keep it in the fridge.
Do I Need to Add Water to the Air Fryer When Cooking Chicken?
No, you don’t. The air fryer uses circulating hot air to cook, so no water is needed. Adding water can actually reduce crispiness.
Is a 5 lb Chicken Too Big for Most Air Fryers?
Often, yes. Most standard air fryers max out around 4 to 4.5 lbs comfortably. Check your basket size and make sure there’s at least one inch of space around the bird.
Can I Cook Two Small Chickens at Once in the Air Fryer?
Only if they both fit with good airflow around each one. Cramming them in will block the circulation and you’ll get uneven cooking throughout.
