
As an Amazon Associate, I earn from qualifying purchases at no extra cost to you.
How to Cook Brats in Air Fryer (How Long It Takes)
Your brats are thawed, your stomach is rumbling, and you want them cooked fast. You've got the air fryer ready, but you're not sure about the timing or the best way to get them just right. This guide will get you cooking delicious, perfectly browned brats without the guesswork. I will show you exactly what to do.
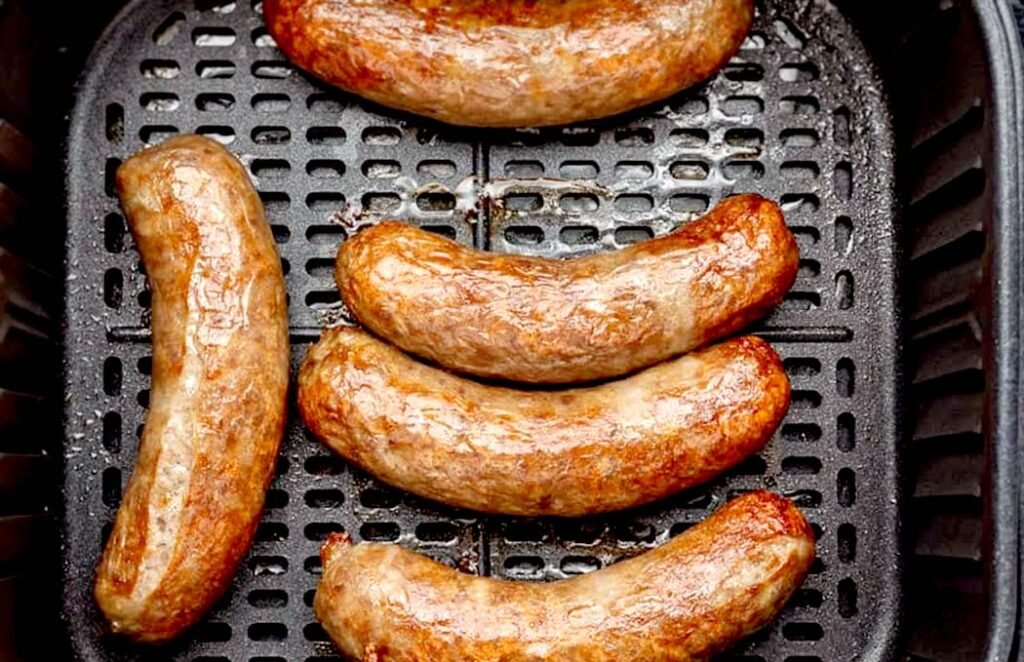
The quickest way to cook brats in your air fryer is to preheat it to 380°F (190°C), place your brats in a single layer without overcrowding, and cook them for 10-12 minutes, flipping halfway through. Your brats should be juicy inside with a nicely browned exterior. You need to ensure your brats are not touching each other for even cooking.
Why Your Brats Need the Air Fryer
The air fryer is a game-changer for cooking brats, offering a faster and often more consistent result than traditional methods. Understanding why it works so well will help you appreciate the delicious outcome. You'll see that it's more than just convenience; it’s about achieving a specific texture and flavor profile that many people love.
Speedy Cooking
This method uses hot circulating air to cook your brats rapidly. The air fryer's design focuses on intense heat distribution. This means your brats get cooked thoroughly in a fraction of the time you might expect.
Your brats are surrounded by this hot air, allowing them to cook quickly from all sides. It's a much more efficient way to get dinner on the table. You will likely find yourself reaching for your air fryer more often for quick meals.
To start, make sure you don't block the air vents on your machine. This allows the air to circulate properly around your brats. You want that hot air to do its job efficiently for the best results.
Crispy Exterior
One of the biggest advantages of using an air fryer for brats is the ability to achieve a satisfyingly crispy skin. This is something that can be tricky with other cooking methods. The high heat and air circulation work together to render the fat and create that delightful texture.
The intense heat helps to crisp up the outside of the bratwurst very effectively. This process is similar to how a convection oven works, but often with more concentrated force. Your brats will have a much more appealing look and feel.
After cooking, let your brats rest for a minute or two before cutting into them. This allows the juices to redistribute, making the inside of your brats even more tender. You want that juicy interior to complement the crisp skin.
Even Cooking
Unlike a pan where you might have hot spots, an air fryer is designed for even cooking. The constant movement of air around the food helps to eliminate cool spots and ensures your brats cook uniformly. This is key to avoiding undercooked centers or burnt edges.
The circulating air is the magic here. It reaches all surfaces of your brats, ensuring they brown and cook at the same rate. You can place them fairly close together, but not piled up, for consistent results.
For the most even cooking, I recommend flipping your brats halfway through. This simple step helps ensure both sides get that perfect golden-brown finish. Your brats will thank you for it.
Healthier Option
Air frying uses significantly less oil compared to deep frying, and often less than pan-frying too. This makes it a healthier choice for preparing your favorite sausages. You can enjoy that delicious cooked flavor without the extra fat.
The process renders fat from the brats, and the air fryer basket catches most of it. This means you get great flavor and texture with less added unhealthy oils. You are making a smarter choice for your meal.
Consider using a spray of oil if you want an extra crispy skin, but it's often not necessary. Your brats will still come out fantastic. You'll be surprised at how good they are.
Minimal Mess
Cleanup is often one of the biggest chores after cooking. The air fryer simplifies this considerably. Most air fryer baskets are non-stick and dishwasher safe, making the post-meal tidy-up a breeze.
You will find that most of the grease and drippings are contained within the basket. This is far easier to clean than a greasy frying pan or a baking sheet. Your kitchen stays cleaner.
Just a quick rinse or a cycle through the dishwasher is usually all it takes. You will save time and energy with this method. Your brats are worth the easy cleanup.
Flavor Retention
The quick cooking time and the self-basting nature of air-fried brats help to lock in their natural flavors. You won’t lose moisture and taste to evaporation as you might with some other methods. The result is a more intensely flavorful bratwurst.
The hot air cooks the brats so fast that the internal juices stay where they belong. You get to taste the sausage as it was meant to be tasted. Your taste buds will be happy.
Don’t overcook them, as that can dry out even the best brat. Keep an eye on the time, and you'll be rewarded with fantastic flavor. You are in control of the outcome.
This section explains why the air fryer is your new best friend for brats. It’s fast, healthy, and keeps things simple. You’ll be serving up perfectly cooked brats with minimal fuss.
Air Fryer Bratwurst: Step-by-step Fix
This is where we get down to business. Follow these steps precisely, and you will have perfectly cooked brats in no time. This process is straightforward, but attention to detail makes all the difference in the final result. You've got this.
Preheat Your Air Fryer
Preheating is a crucial first step for most air fryer recipes, including brats. It ensures that when you place the brats inside, they immediately start cooking at the correct temperature. This helps achieve that desirable sear and crisp exterior right from the beginning. If you skip this, your brats might end up steamed rather than fried.
The air fryer needs time to reach its set temperature, just like a conventional oven. Running it for about 3-5 minutes before adding your food ensures the air inside is hot and circulating intensely. This consistency is key to getting your brats perfectly browned and cooked through without getting tough.
So, set your air fryer to 380°F (190°C) and let it run for a few minutes. You can usually tell it's ready when the preheat indicator light goes off or you can feel the hot air emanating from it. Your brats deserve a hot start.
Prepare the Brats
Before they go into the air fryer, ensure your brats are ready. If they are frozen, it's best to thaw them first for even cooking. You can thaw them in the refrigerator overnight or use the defrost setting on your microwave. Make sure they are completely thawed and patted dry with a paper towel.
Patting the brats dry is important. Excess moisture can create steam, which hinders the crisping process. You want a dry surface so the hot air can directly crisp the skin. This simple step makes a noticeable difference in the final texture.
You don't need to add any oil at this stage, as brats have enough fat. Just ensure they are ready to go straight into your preheated air fryer. Your brats are now prepped for greatness.
Arrange in Basket
Next, place your prepared brats into the air fryer basket. It's very important that you arrange them in a single layer. Do not overlap them or crowd the basket. This allows the hot air to circulate freely around each brat, ensuring they cook evenly on all sides. Overcrowding will lead to some brats being undercooked or steamed.
Think of it like a very efficient oven; everything needs exposure to the heat. If you are cooking a larger batch, it is better to cook them in two separate rounds. Your air fryer's capacity will determine how many fit comfortably.
You can fit about 3-5 brats in a standard 5-quart air fryer, depending on their size. If your brats are touching slightly, that’s usually okay, but avoid them being significantly piled up. Your brats will thank you for the space.
Cook and Flip
Set your air fryer to 380°F (190°C) and cook for approximately 10 to 12 minutes. This time can vary slightly depending on your air fryer model and the thickness of your brats. It's always best to start checking them a minute or two before the timer is up. You want them cooked through but still juicy.
Crucially, halfway through the cooking time, you need to flip the brats. This ensures that both sides get an even amount of heat and browning. Open the air fryer, use tongs to carefully turn each brat over. This step is vital for consistent color and doneness.
Once flipped, continue cooking for the remaining time. You can also gently shake the basket if you prefer, but flipping with tongs gives more direct control over each brat. Your brats will be looking good at this point.
Check for Doneness
After flipping and finishing the cooking cycle, check your brats for doneness. They should be firm to the touch and have a nice, deep golden-brown color. If you have a meat thermometer, the internal temperature should reach at least 160°F (71°C) for fully cooked brats.
If your brats aren't quite there yet, you can always pop them back in for another 2-3 minutes. Keep a close eye on them to prevent overcooking. You want them juicy, not dry.
Your brats should look appealing and smell delicious. This is the moment of truth. Your air fryer has done its job beautifully.
Rest and Serve
Once your brats are cooked to perfection, remove them from the air fryer basket using tongs. Place them on a plate or serving platter and let them rest for about 5 minutes. This resting period is important because it allows the juices inside the brats to redistribute. If you cut into them immediately, all that lovely juice will run out.
This resting step is what makes your brats incredibly moist and flavorful. It might seem like a small thing, but it makes a big difference to the final eating experience. You can use this time to prepare your buns and toppings.
Serve your perfectly cooked air fryer brats hot with your favorite accompaniments. You have successfully cooked brats in the air fryer. Enjoy your meal.
- Here are a few bullet points to help you remember the process:
- Preheat to 380°F (190°C).
- Arrange brats in a single layer.
- Cook for 10-12 minutes total.
- Flip them halfway through.
- Your brats should reach 160°F (71°C).
- Let them rest for 5 minutes before serving.
Signs of Overcooked Brats
Sometimes, despite your best efforts, brats can end up a little too done. Recognizing the signs of overcooking will help you avoid this in the future and save your brats from becoming unappetizing. You need to know what to look for so you can prevent it.
Dry Interior
The most common sign of an overcooked brat is a dry, crumbly interior. This happens when the internal moisture has been cooked out of the sausage. You'll notice it when you bite into it, and it just doesn't have that satisfying juiciness you were hoping for.
This dryness is caused by cooking the brats for too long or at too high a temperature. The proteins tighten too much, squeezing out all the moisture. Your brat should be tender, not tough.
If you notice your brats are starting to look dry, remove them immediately. You might be able to save them from becoming completely unpalatable, but it's best to get the timing right from the start. You want juicy results every time.
Split Casing
Another clear indicator that your brats have been overcooked is a split or burst casing. This happens when the internal pressure from the cooking process becomes too great for the casing to contain. It often occurs when brats are cooked too quickly or at excessive heat.
The casing might start to look tight and then suddenly split open, releasing the juices. This is often accompanied by a loss of flavor and texture. Your brats should stay intact.
This splitting can sometimes be a sign of an older or weaker casing, but overcooking is usually the main culprit. You should always try to maintain a consistent, moderate heat. Your brats deserve a good casing.
Tough Texture
Overcooking also results in a tough, chewy texture. Instead of a tender bite, you get a sausage that requires significant chewing. This is a result of the proteins in the meat becoming overly denatured and tightened.
The sausage essentially becomes hard to chew because all the natural tenderness has been cooked away. It's a very unappealing sensation when you bite into it. Your expectation of a juicy brat is shattered.
This is why paying close attention to cooking times and temperatures is so important for achieving the best results. You want your brats to be tender, not tough.
Burnt Appearance
While the air fryer can create a beautiful brown color, overcooking can lead to an actual burnt appearance. This means the exterior has turned black and might taste acrid or bitter. This is beyond a nice char and into the realm of ruined food.
A burnt exterior indicates that the temperature was too high or the cooking time was far too long for your brats. It's an irreversible mistake. Your brats have gone too far.
Always aim for a deep golden brown, not black. If you see any signs of blackening, remove the brat immediately. You can still salvage the rest of your batch if you catch it early.
The key is to watch your brats closely and use a thermometer if you're unsure. Overcooked brats are disappointing, but knowing these signs helps you avoid them. You want perfectly cooked, never burnt, brats.
Internal Temperature Guide
Using a meat thermometer is the most reliable way to know if your brats are cooked perfectly. It takes the guesswork out of the equation and ensures your food is safe to eat and deliciously cooked. This is a crucial step for any meat cook.
Target Temperature
For brats, the safe internal temperature is 160°F (71°C). This temperature ensures that any harmful bacteria are killed, making them safe for you to consume. It’s also the point where the bratwurst is fully cooked, juicy, and has a pleasant texture. Don’t guess on this.
You should insert the thermometer into the thickest part of the brat, avoiding any bone if it were present, though brats typically don’t have them. Make sure you are not touching the side of the air fryer basket, as this can give a false reading. Your reading needs to be accurate.
This temperature provides a good balance between being safely cooked and retaining moisture. Anything lower might be unsafe, and anything significantly higher risks drying them out. Your brats deserve this precision.
Checking the Brat
When you think your brats are done, take them out of the air fryer. Insert the probe of your meat thermometer into the side of the brat. You need to get it into the center for an accurate reading. Be patient and get it right.
Make sure the thermometer is not touching the sides of the air fryer basket. This could skew your reading and lead you to believe they are done when they aren’t, or vice versa. Your reading must be from the brat itself.
If the temperature is below 160°F (71°C), put them back in the air fryer for a few more minutes and check again. Continue this process until you reach your target temperature. You are in control of the perfection.
Using a Thermometer
If you don't own a meat thermometer, I highly recommend getting one. They are relatively inexpensive and will dramatically improve your cooking accuracy for all types of meat, not just brats. It's a small investment for great results.
They take the anxiety out of cooking. You'll know with certainty when your food is safe and perfectly cooked. Your confidence in the kitchen will grow.
You can find digital instant-read thermometers which are particularly useful and quick. They give you a reading in just a few seconds. Your cooking will be elevated.
Factors Affecting Time
Remember that cooking time can vary based on your specific air fryer model, the size and thickness of your brats, and whether they were previously frozen. This is why checking the internal temperature is more important than strictly adhering to a timer. Your results will vary.
Your air fryer might run hotter or cooler than others, and thicker brats will naturally take longer to cook through. You need to be observant.
Always trust your thermometer over the clock. It's the most accurate way to determine doneness. Your delicious, perfectly cooked brats are worth the small effort.
Using a thermometer guarantees safety and quality. It's the most foolproof way to ensure your brats are cooked just right. You'll be amazed at the difference it makes.
Preheating Importance
Preheating your air fryer is a critical step that many people overlook, but it makes a significant difference in how your food cooks. It ensures that your brats hit the hot air immediately, promoting proper browning and a crispier exterior. You want that initial sizzle.
Skipping preheating means your brats will start cooking in a cooler environment. The machine will take longer to heat up, and the brats might end up steamed rather than air-fried. This can lead to a softer skin and less appealing texture.
Your air fryer needs time to build up that intense, circulating heat. Giving it a few minutes to preheat ensures that this heat is ready and waiting for your brats the moment they go in. You'll get better results from the very first bite.
What Preheating Does
Preheating allows the air fryer to reach its set temperature before you add your food. This means that as soon as your brats hit the basket, they are exposed to consistent, high heat. This immediate exposure is what helps to create a beautiful sear and crispy skin. It kicks off the cooking process effectively.
Without preheating, the air fryer's heating element and fan have to work harder to heat up the food and the air simultaneously. This can lead to uneven cooking and a less satisfying texture. Your brats deserve a hot start.
The consistent temperature from preheating also helps to cook your brats more evenly. You won't have one side that's nicely browned while the other remains pale and soft. You'll get a uniform result.
Impact on Texture
The crispy exterior you desire on your air-fried brats is heavily dependent on preheating. High, consistent heat causes the fats in the bratwurst casing to render quickly, leading to that delightful crispiness. If the air isn't hot enough, this process is significantly slowed down or doesn’t happen at all.
A properly preheated air fryer helps to lock in moisture initially by searing the outside quickly. This means the inside stays juicy while the outside gets that perfect crunch. Your brats will have a pleasing contrast in textures.
If you don’t preheat, your brats may end up with a rubbery or soggy texture because they spend too much time steaming before the air gets hot enough to crisp them. You don’t want that.
Time Considerations
While it might seem like an extra step, preheating usually only takes 3-5 minutes. This is a very small investment of time when you consider the improvement it makes to your final dish. Your brats will be ready much faster with a better quality.
Think of it as part of the cooking process itself. It's not just waiting time; it's active preparation for optimal cooking. You are setting yourself up for success.
The few extra minutes spent preheating are well worth it for the superior taste and texture you achieve. You'll be glad you did.
Preventing Stuck Food
Preheating also helps prevent food from sticking to the air fryer basket. When a cold basket meets food, the proteins can begin to stick immediately. Once the basket is hot, the food has a better chance of releasing cleanly after cooking. Your brats should come out easily.
The hot air circulation created by preheating also helps to move food, reducing the chance of it adhering firmly to the basket surface. This makes cleanup much easier later on. You'll appreciate this benefit.
Always ensure your basket is clean before cooking, but preheating adds an extra layer of non-stick security. Your brats should slide right out.
Preheating is a simple but essential step for great air fryer brats. It ensures even cooking, better texture, and easier cleanup. You will notice the difference in your results.
How Many Brats to Cook
Figuring out how many brats to cook in your air fryer at once is all about balance. You need enough to make the cooking session worthwhile, but not so many that you compromise the quality of the cook. It’s a common question people have when they start using their air fryer.
Air Fryer Size Matters
The primary factor determining how many brats you can cook is the size of your air fryer. These appliances come in various capacities, typically ranging from 2 to 6 quarts or more. A larger air fryer can accommodate more brats, while a smaller one will require cooking in batches. You need to know your machine’s limits.
A smaller air fryer, like a 2-quart model, might only fit 2-3 standard-sized brats comfortably. A larger 5.8-quart model, on the other hand, could likely hold 4-6 brats in a single layer. Your specific model will have its own capacity.
Always consult your air fryer’s manual if you’re unsure about its capacity for specific items. You want to avoid overcrowding at all costs for the best results. Your brats deserve the best cooking environment.
Single Layer Rule
The golden rule for air frying is to cook in a single layer. This allows the hot air to circulate effectively around each brat, ensuring even cooking and browning. Piling brats on top of each other will result in unevenly cooked food, with the ones on top potentially burning and the ones on the bottom remaining undercooked or steamed. Your brats need space to breathe.
When you place brats in a single layer, they have enough room to get crispy on all sides. This is the key to achieving that desirable texture that makes air-fried food so appealing. You are maximizing the air fryer's potential.
If you have too many brats to fit in a single layer, it's always better to cook them in multiple batches. It takes a little longer overall, but the quality of the finished product will be significantly better. You'll be happier with the outcome.
Batch Cooking Strategy
If you need to cook more brats than your air fryer can handle in a single layer, plan on cooking in batches. This is the most effective way to ensure all your brats are cooked to perfection. You might cook the first batch while you prepare the buns and toppings for them.
Once the first batch is done, remove them and keep them warm (perhaps in a low oven). Then, add the second batch of brats to the preheated air fryer basket and cook them following the same instructions. Your patience will be rewarded.
This batch cooking approach ensures consistent results for every single brat you serve. Your guests will appreciate the uniformity. You’ve got this system down.
Size and Thickness
The size and thickness of your brats also play a role in how many fit comfortably in your air fryer. Standard bratwursts are a good size, but some varieties can be significantly larger or thicker. These bulkier brats will take up more space and may require you to cook fewer at a time.
You need to visually assess how much space each brat takes up. If they are particularly large, you might only fit two or three in a smaller air fryer. Your judgment is important here.
Always leave a little wiggle room between them to allow for proper air circulation. This ensures each one gets the heat it needs to cook beautifully. Your brats will be perfectly cooked.
How Many is Enough
Ultimately, the number of brats you cook depends on how many people you are serving. A general guideline is 1-2 brats per person, depending on their appetite and what else you are serving. Calculate your needs and then adjust for your air fryer's capacity.
If you're serving a crowd, you'll likely need to do multiple batches regardless of your air fryer size. Plan your cooking schedule accordingly to minimize waiting time between batches. Your efficient planning pays off.
Consider the size of your air fryer and the number of people you’re feeding when deciding how many brats to cook. Your goal is perfectly cooked brats for everyone.
Deciding how many brats to cook involves considering your air fryer size and serving needs. Prioritize a single layer and batch cooking if necessary for the best results. You'll master this quickly.
- Here are some quick tips for batch cooking brats:
- Know your air fryer’s capacity.
- Always cook in a single layer.
- If needed, cook in multiple batches.
- Keep cooked brats warm in a low oven (around 200°F/95°C).
- Preheat the basket for each new batch.
- Your brats will be ready for everyone.
Brats Cooking Time
The cooking time for brats in an air fryer is usually quite quick, but it can vary. Understanding the factors that influence this time will help you achieve perfectly cooked brats every single time. You want them done right, not too fast or too slow.
Base Cooking Time
For standard-sized, thawed bratwursts, a cooking time of 10-12 minutes at 380°F (190°C) is generally sufficient. This range allows for even cooking and browning. However, this is a guideline, and you should always check for doneness.
This time assumes your air fryer is properly preheated. If you skip preheating, you might need to add a few extra minutes to the total cooking duration. Your brats need that initial hot blast.
Remember to flip them halfway through to ensure both sides cook evenly. This simple step is crucial for achieving uniform browning. You'll see the difference it makes.
Thickness of Brats
Thicker brats naturally take longer to cook through than thinner ones. If you have particularly large or jumbo brats, you may need to increase the cooking time by a few minutes. Always err on the side of checking them a little early.
A thicker brat needs more time for the heat to penetrate to the center. You don’t want a raw or undercooked middle. Your patience here pays off in a perfectly cooked interior.
You can always add more time in short increments if needed. It's much harder to fix overcooked brats. Your focus should be on gradual cooking.
Frozen Vs. Thawed Brats
Cooking brats directly from frozen will significantly increase the cooking time. While it’s possible, it’s generally recommended to thaw brats first for the best and most consistent results. If you must cook from frozen, expect the time to be closer to 16-20 minutes.
The frozen center will take much longer to heat up, and you risk the outside overcooking before the inside is done. This can lead to uneven textures and potentially dry brats. You want your brats to be perfect.
To thaw brats safely, place them in the refrigerator overnight. This is the best method. You can also use the defrost setting on your microwave, but ensure they are completely thawed before air frying.
Air Fryer Model
Different air fryer models can have slightly varying heating capabilities. Some might run hotter than others, while some circulate air more intensely. This means that cooking times can fluctuate from one air fryer to another. Always consult your specific model’s recommendations if available.
It’s a good idea to get familiar with how your particular air fryer cooks. The first few times you make brats, keep a close eye on them. You'll quickly learn the nuances of your machine.
Your personal experience with your air fryer will be the best guide. Pay attention to the results you get. You are the ultimate judge.
Checking Doneness
The most reliable way to determine if your brats are done is by using an instant-read meat thermometer. Insert it into the thickest part of the brat; it should register 160°F (71°C). This ensures they are cooked safely and perfectly. You can trust the thermometer.
Visually, brats should be a deep golden brown, and the casing should appear firm. If they look pale or feel soft, they likely need more time. Your visual cues are helpful but secondary to temperature.
By understanding these factors, you can adjust the cooking time as needed for your brats and your air fryer. Your perfect brats are just a few minutes away.
Adjusting cooking time based on these factors ensures your brats are cooked perfectly. Always prioritize checking the internal temperature for safety and taste. You'll achieve delicious results.
How to Cook Brats on Stove Top
While the air fryer is excellent, sometimes you might need to cook brats on the stovetop. This method is also effective and can produce delicious results. You'll want to know this alternative if your air fryer is unavailable or if you're cooking a very large batch.
Pan-frying Method
For pan-frying, start by placing your brats in a large skillet. Add just enough water to cover the bottom of the pan, about half an inch. Cover the skillet with a lid. Heat the water to a simmer over medium-high heat and cook for about 10 minutes. This step helps to cook the brats through evenly.
After the water has reduced, remove the lid. If there's still some water left, let it evaporate. Now, add a tablespoon or two of oil to the skillet. Continue to cook the brats over medium heat, turning them regularly, until they are nicely browned and slightly crispy on all sides. Your brats will get a good sear.
This method uses a two-step approach: boiling then frying. It ensures that the inside is cooked before the outside gets browned, preventing the casing from splitting too easily. You get the best of both worlds.
Simmering Method
Another stovetop option is simple simmering. Place your brats in a pot and cover them with water. Bring the water to a boil, then reduce the heat to low and let them simmer gently for about 15-20 minutes. This method is very straightforward and ensures the brats are cooked through.
After simmering, you can remove them from the water and pat them dry. If you want a browned exterior, you can then quickly sear them in a hot, oiled skillet or under the broiler for a minute or two per side. This gives them that classic look and a bit of texture.
This method is particularly good if you plan to add the brats to other dishes later, like in a casserole or soup, where a crispy exterior isn't essential. Your brats will be tender and fully cooked.
Broiling Brats
Broiling can also be an effective way to cook brats if you want a quick method that achieves some browning. Place the brats on a broiler pan or a baking sheet lined with foil. Position them about 4-6 inches away from the broiler element.
Broil for about 10-15 minutes, turning them every few minutes to ensure even cooking and browning on all sides. Keep a close eye on them, as broilers can be intense and brats can burn quickly under direct heat. Your attention is key here.
This method works well for achieving a nice char, similar to grilling, but requires constant monitoring. You'll want to make sure you don't step away from the oven. Your brats will look and smell amazing.
Timing and Doneness
Regardless of the stovetop method you choose, always ensure the brats reach an internal temperature of 160°F (71°C). This is the safest and most accurate way to confirm they are fully cooked. Visual cues like browning are helpful but don’t guarantee safety.
You can use a meat thermometer for any of these stovetop methods. It's the most reliable tool for checking doneness, especially if you're unsure. Your peace of mind is important.
Stovetop cooking offers flexibility when your air fryer isn’t an option. You can still achieve delicious, well-cooked brats with these methods. Your cooking skills are versatile.
You can successfully cook brats on the stovetop using several methods. Each offers slightly different results, but all ensure your brats are fully cooked and delicious. Your culinary options are broad.
